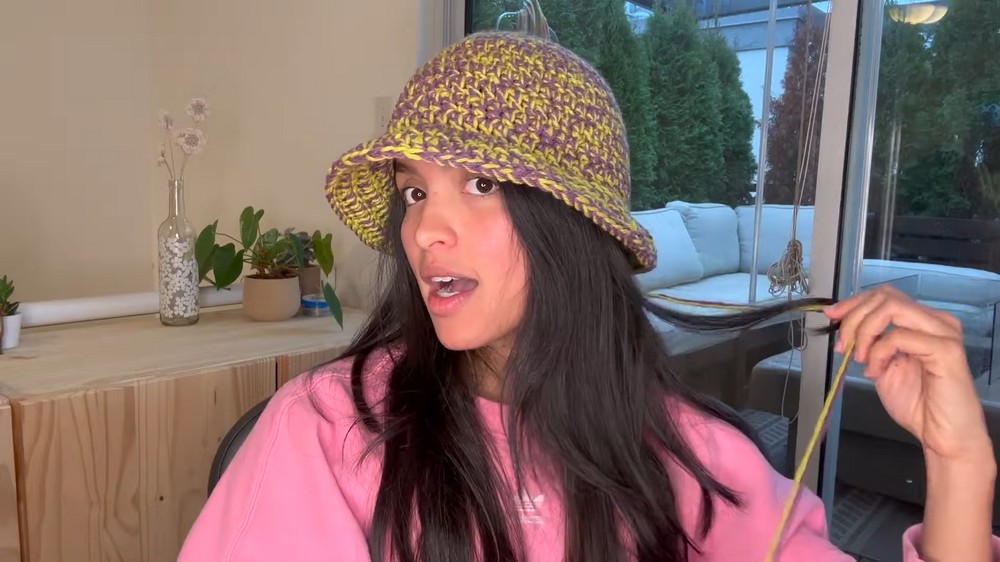
Spark curiosity with this Crochet Bucket Hat Pattern and enjoy comfort, playful colors, and a trendy accessory perfect for sunny adventures.
Handmade accessories have a way of blending artistry with everyday function, and one of the most charming examples is the crochet bucket hat pattern. Right now, this design is enjoying a surge in popularity thanks to its balance of practicality and style. The hat’s wide brim offers gentle shade, making it a useful companion for sunny outings, while its soft structure ensures comfort without compromising on fashion.
Cozy Trend Crochet Bucket Hat Pattern for Everyday Adventures

What makes it especially appealing is the creative freedom it provides—crocheters can experiment with textures, stitches, and colors to produce a piece that reflects their personality. Whether styled in bold hues for a playful statement or in muted tones for a minimalist look, the finished hat carries a distinctive handmade warmth.
Beyond its aesthetic, the process of crocheting itself is calming and rewarding, turning simple yarn into a wearable piece of art. This pattern continues to inspire makers who value individuality and timeless charm.
Special Features
- Uses a seamless perfect circle technique for a smooth, even crown
- Worked with double-stranded worsted weight (Size 4) acrylic yarn for a chunky, cozy result
- Includes clear steps for increases and shaping, minimizing visible seams
- Brim worked using front loop only for a crisp edge and wave flattening for a modern look
- Easy to customize length and width for the perfect fit
Skill Level
Confident Beginner – Intermediate
You should know basic crochet stitches (chain, single crochet, double crochet, half double crochet, slip stitch) and how to work in the round.
Uses
- Stylish everyday hat
- Bold, colorful accessory for fall and winter
- Gift for friends and family
- Great project for using scrap yarn
Materials
- Worsted Weight (Size 4) Acrylic Yarn – two colors, doubled for extra chunkiness
- 6.0 mm or size appropriate crochet hook
- Stitch markers (optional, but helpful)
- Scissors
- Yarn needle for weaving in ends
Pattern Steps
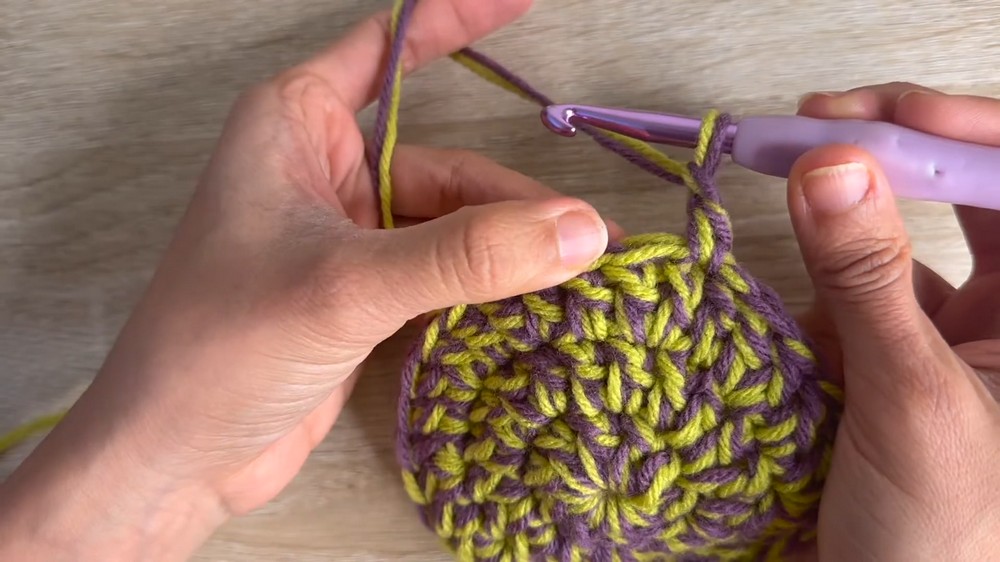
1. Foundation & Crown (Perfect Circle)
- Start with a Magic Ring.
- Into the ring: Work 1 single crochet, chain 1 (sc, ch 1) to begin.
- Work 9 double crochets (dc) into the ring (your starting sc/ch 1 counts as the first stitch).
Total stitches: 10
- Pull the ring tight to close.
- Slip stitch into the first double crochet (not the initial sc/ch 1).
2. Increase the Circle
Round 2:
- Insert your hook into the back of the first stitch, pull yarn through, and work from the front again, as shown in the special technique.
- Into the first stitch: (sc, ch 1)
- In same stitch: 1 dc.
- In every following stitch: 2 dc in each.
- Total stitches: 20.
- Slip stitch into the first dc.
Round 3:
- Seamless join as before.
- Start: (sc, ch 1) in first stitch.
- Alternate: 1 dc in next stitch, 2 dc in the next (increase).
- Repeat this sequence around.
- Total stitches: 30.
- Slip stitch to first dc.
Round 4:
- Start: (sc, ch 1) in first.
- Pattern: 1 dc in next 2 stitches, then 2 dc in next (increase).
- Repeat around.
- Total stitches: 40.
Round 5:
- Start: (sc, ch 1).
- Pattern: 1 dc in next 3 stitches, 2 dc in next (increase).
- Repeat around.
- Total stitches: 50.
Round 6: (Change to Half Double Crochet)
- Start: (sc, ch 1).
- Pattern: 1 hdc in next 4 stitches, 2 hdc in next (increase).
- Repeat around.
- Total stitches: 60.
3. Sides of the Hat
- Start each round with (sc, ch 1), then work one double crochet in each stitch around—no more increases.
- Slip stitch to first dc at the end of each round.
- Continue for six rounds (or until the hat reaches your desired length from crown to above your eyebrows).

4. Brim Construction
First Brim Row:
- Work with front loop only for a crisp edge.
- Start: (sc, ch 1) in first.
- Pattern: 2 dc, then 2 dc in next stitch (increase). Repeat [dc, dc, inc] around.
- Slip stitch to first dc.
Second Brim Row:
- Regular dc, both loops. One dc in every stitch. No increases.
Third Brim Row:
- To flatten any waviness, strategically place increases. Place a double crochet increase every 7 stitches.
- Example: 7 dc, inc—repeat until end.
- Adjust as needed at the end of the round; don’t stress if the increase spacing isn’t perfect.

5. Final Touches
- Try your hat on. If you want a deeper or wavier brim, add more rounds—try even a round of single crochet for finishing.
- Fasten off, weave in the yarn ends.
Tutor’s Suggestions
- Count your stitches at the end of every round to keep the circle even and the hat symmetrical.
- Customize your brim: Add more rows for a floppier look, fewer for a structured style.
- Use bold, contrasting colors for a playful accessory or subtle tones for a classic vibe.
Conclusion
This pattern offers a modern, playful spin on the crochet bucket hat, emphasizing a seamless finish and statement brim. The clear increase sequence helps maintain the hat’s shape, while the special seamless circle technique ensures your crown stays smooth and perfect.
Tip
When working the brim, if you notice it’s ruffling or curling, block your hat gently with steam or spray mist, reshaping the brim until it lies flat and crisp.


Leave a Reply