
Stitch playful floral charm into every project with this Crochet Daisy Granny Square Pattern that brings cozy style to handmade creations.
Looking for a fun and charming way to add flowers to your crochet projects? The Crochet Daisy Granny Square Pattern lets you create beautiful granny squares with daisies right in the center, giving a fresh and cheerful look to blankets, bags, cushions, and other crochets. This pattern is easy to follow for beginners but also enjoyable for more experienced crocheters, making it a great choice for anyone.
Dreamy Crochet Daisy Granny Square Pattern for Your Next Blanket

You can play with colors and use up leftover yarn, so each square becomes truly unique and personal. The Crochet Daisy Granny Square Pattern adds soft texture and sweet handmade vibes, while the bright daisy design brings a touch of spring to your projects.
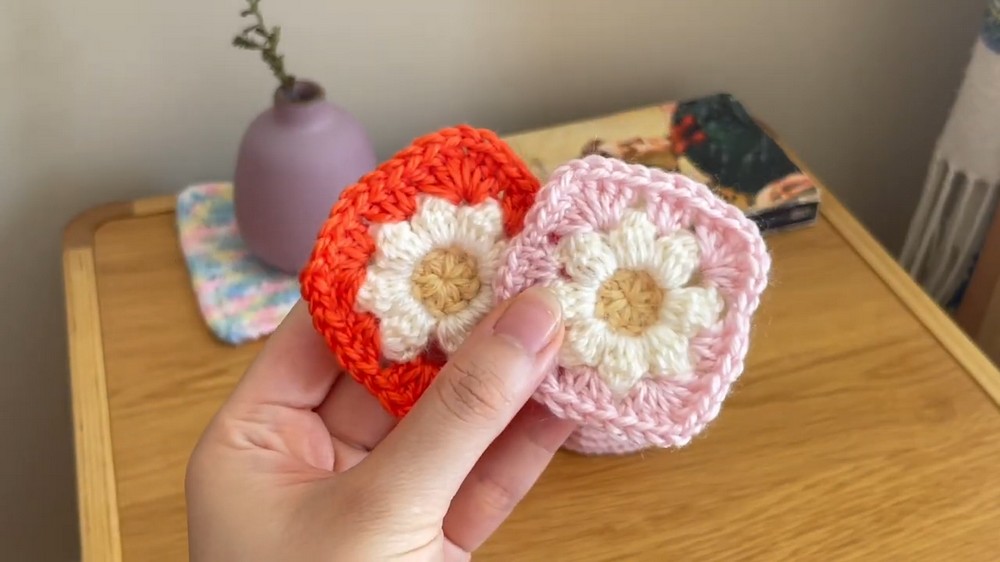
Whether you want to make special gifts or brighten up your own space, this daisy granny square never go out of style and are sure to make you feel happy and creative.
Special Features
- 3D Puffy Daisy: The cluster stitch makes each petal stand out, adding dimension.
- Customizable Colors: Switch up petal and square shades to match your style or project.
- Perfect for Mix-and-Match Projects: Great for bags, blankets, cushion covers, and more.
Level of Difficulty
Confident Beginner to Intermediate:
Some experience with basic crochet stitches is helpful, especially double crochet, magic ring, and working with color changes.
Materials Needed
- Yarn: Four colors, less than 50g of each
- Muted yellow (daisy center)
- Off-white (petals)
- Pink and red (alternating square rounds)
- Hook: 3 mm crochet hook
- Notions: Scissors, darning needle
- Optional: Stitch markers, measuring tape
Tutor’s Tip: Use leftover yarns to make each square unique or stick to a cohesive palette for a coordinated look.
Step-by-Step Pattern
Step 1: Daisy Centre (Magic Ring)
- With yellow, create a magic ring.
- Chain 2 (counts as first double crochet, DC).
- Work 7 more DC into the ring (8 total).
- Pull the tail to cinch and close the ring.
- Slip stitch (sl st) into the first DC (do not use the initial ch-2).
- Chain 1 to secure, fasten off, and weave in the end.

Step 2: Petals (Cluster Stitches)
- Attach off-white yarn to any of the 8 stitches with a standing DC (slip knot on hook, yarn over, insert into stitch with wrong side facing you).
- For each petal (work in the same stitch):
- [Yarn over, insert, pull up loop, yarn over, pull through two] 4 times (last loop left unworked).
- You will have five loops on your hook.
- Yarn over and pull through all 5 loops.

- Chain 1 to secure the cluster, chain 1 again to move to the next stitch.
- Repeat for all 8 petals.
- Sl st to the first ch-1 at the start of the round.
- Chain 1 and fasten off.
3: Granny Square (Background)
- With the chosen background color (pink or red), attach with a standing DC in any petal’s chain space (between petals).
- In first space: 3 DC.
- In next space: [3 DC, chain 1, 3 DC]—this creates a corner.

- Alternate: repeat (3 DC in one space, [3 DC, ch 1, 3 DC] in the next) all the way around.
- Sl st into the starting DC to join.
- Fasten off.
4: Weaving in Ends
- Thread your yarn tail through a darning needle.
- Weave ends under the stitches in at least three different directions for security.
- Optionally, tie a small knot within the magic ring before weaving that tail in.
- Trim excess yarn.

Tutor’s Suggestions and Uses
- Make 24 squares (12 in red, 12 in pink) for a checkered shoulder bag.
- Practice weaving in ends as you go so you’re not overwhelmed at the end.
- These squares can also be joined into blankets, cushion covers, or decorative bunting.
Crocheting Tip
Loose Tension is Key:
When making petals, keep your stitches tall and loose—this ensures each daisy petal puffs up beautifully and your work lays flat.
Conclusion
You’ve now created a gorgeous daisy granny square—unique, puffy, and perfect for imaginative crochet projects. Repeat these steps to make as many squares as you need for your next creation. In the upcoming tutorial, you’ll learn how to join these to build a checkered shoulder bag.




Leave a Reply