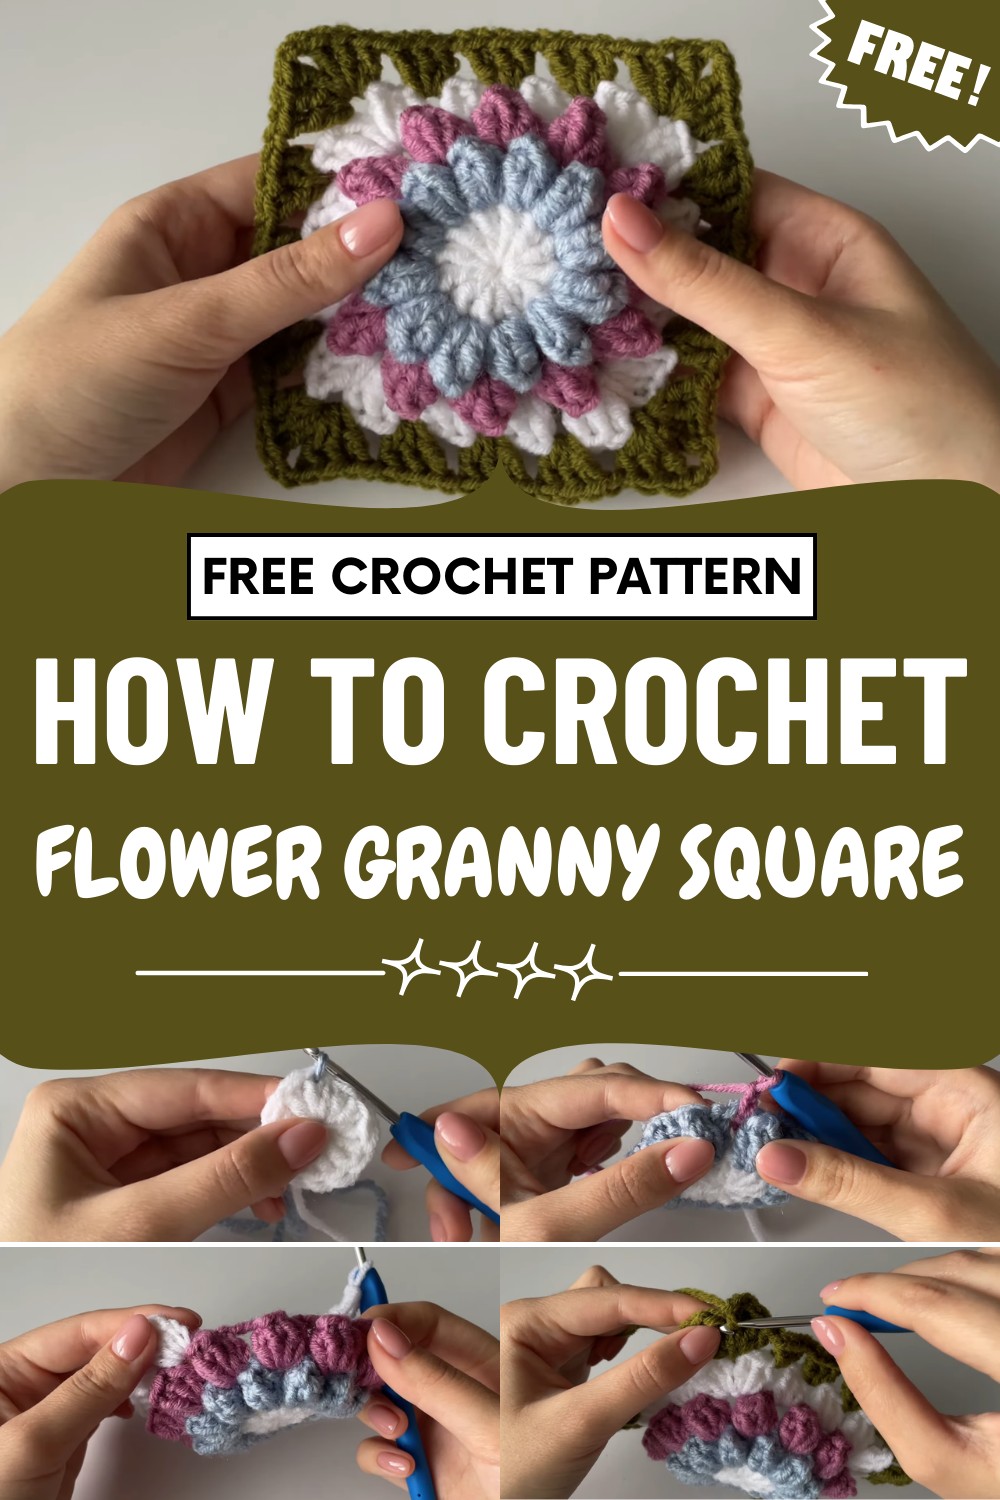
Bloom with creativity using this Crochet Flower Granny Square Pattern, a cheerful way to add vibrant flair to blankets, cushions, or décor.
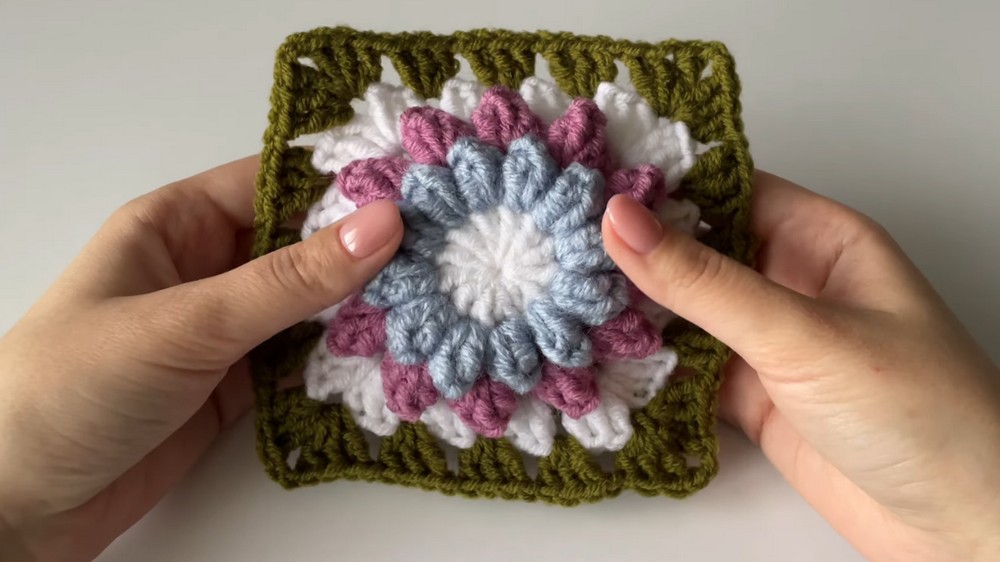
Truly captivating in both design and versatility, the crochet flower granny square pattern stands as a favorite among crochet enthusiasts for good reason. Each square bursts with the charm of layered blossoms, adding delightful color and texture to any project. The unique combination of a classic granny square with intricate floral motifs ensures that finished pieces exude both vintage elegance and modern appeal.
Twinkle Crochet Flower Granny Square Pattern to Make Stunning Gifts
Whether crocheted into blankets, pillow covers, bags, or even wall décor, this versatile squares infuse warmth and artistry into the home. Makers appreciate how the pattern invites endless creativity with color choices, allowing for personalized expression in every stitch.
Beyond aesthetics, this pattern is also approachable and rewarding, fostering relaxation while offering a practical way to use leftover yarn. As a gift or centerpiece, the finished squares serve as lasting reminders of the beauty created by hand, making every project a true heirloom in the making.
Crochet 3D Flower Granny Square Pattern
Special Features
- Showcases a highly dimensional, layered flower in the center.
- Works up quickly, great for scrap yarn use.
- Ideal for multi-color combinations.
- Blocks into a square, easy to join for larger projects.
Uses
- Blankets and throws
- Cushion covers
- Tote bags
- Table mats
- Decorative projects
Materials Needed
- 4-5 colors of DK or worsted weight yarn (choose colors for flower petals, square background, and leaf border)
- Crochet hook matching yarn weight ( typically 4mm or 5mm )
- Scissors
- Yarn needle
Abbreviations:
- ch: chain
- dc: double crochet
- sl st: slip stitch
Pattern Steps
Row 1: Flower Center
- Make a magic ring: Wrap yarn around your fingers, insert hook under loop, pull a loop, chain one.
- Chain one. You now have two chains.
- Into the ring, work 12 double crochets (dc).
- Pull the short tail to close the ring.
- Slip stitch (sl st) into the first dc to join.
- Chain one to secure, cut yarn leaving a short tail.
Row 2: First Flower Layer (Petals)
- Take a new color yarn for petals, make a slip knot.

- Insert hook into the slip stitch from previous round, pull slip knot through.
- Chain two.
- In the same stitch, work four double crochets (dc), so you have a group of 4 dc.
- Remove hook from the working loop. Count back four stitches to the first dc, insert hook into top of the first dc, grab working loop and pull it through. This creates a petal cluster.
- Chain two, move to next stitch, repeat step 4 and 5 for next petal.
- Continue this pattern, making a petal (4 dc cluster) in each stitch and chaining 2 between petals.
- At the end, there should be 12 petals. After the last petal, chain two and slip stitch into the center of the first petal.
- Chain one, cut yarn, secure.
Row 3: Second Flower Layer
- Use a new color for the second flower layer (dusty rose suggested).

- Make a slip knot, insert hook into the space between two petals.
- Pull through, chain two.
- Into the same space, work five double crochets (dc) for a bigger petal.
- Remove hook from working loop. Count back five stitches to first dc, insert hook in top of first dc, grab the loop and pull through (petal cluster).
- Chain three, move to next chain space, repeat petal cluster.
- Continue all the way around. You should have 12 larger petals with 3 chains between each.
- After last petal and chain 3, slip stitch to the top of the first petal.
- Chain one, cut yarn, secure.
Row 4: Granny Square Border
- Take a new color for square (white suggested).
- Make slip knot, insert hook into any space between flower petals.

- Pull slip knot through, chain 2.
- In the same space, work 3 dc.
- Chain one, move to next chain space and work 3 dc.
- Repeat this across, making 3 dc in each space and chain 1 between groups.
- At the corners (after a few groups): In a chain space, work 3 dc, chain 2, 3 dc (corner formation).
- Continue around, forming corners after every several groups. There should be four corners in total.
- Finish with slip stitch to the first dc, chain one, cut yarn, secure.
Row 5: Final Square Border
- Use a new color (green suggested) for the leafy border.
- Make slip knot, insert hook into center of any corner space, chain 2.
- In same space, work 3 dc.
- In each chain space along the sides, work 3 dc, chain 1 between groups.
- At each corner: 3 dc, chain 2, 3 dc in same corner space.
- Continue all around the square.
- At final corner, finish with 3 dc, chain 2, slip stitch into first dc.
- Chain one, cut yarn, secure.

Tutor’s Suggestions & Tips
- Weave in your yarn ends neatly after each row for a professional finish.
- Try varying petal colors for a realistic flower effect.
- Don’t skip the clusters—pull the working loop through the first dc/tr/dc of every petal for best 3D dimension.
- Block your finished square if needed for perfect shape.
Tip
For bolder petals, use a thick yarn or add extra stitches to each petal. To keep the square shape crisp, always use chain 2 in corners and chain 1 between each petal border group.
Conclusion
This 3D flower granny square is a gorgeous motif that combines classic crochet techniques with modern flair. It’s great for beginners looking to expand to textured patterns and perfect for crafters seeking eye-catching projects. Enjoy creating beautiful squares for yourself and your loved ones.


Leave a Reply