Snag this Free Crochet Openwork Bolero Pattern and stitch a breezy, stylish layer that adds playful charm to your wardrobe for any season.
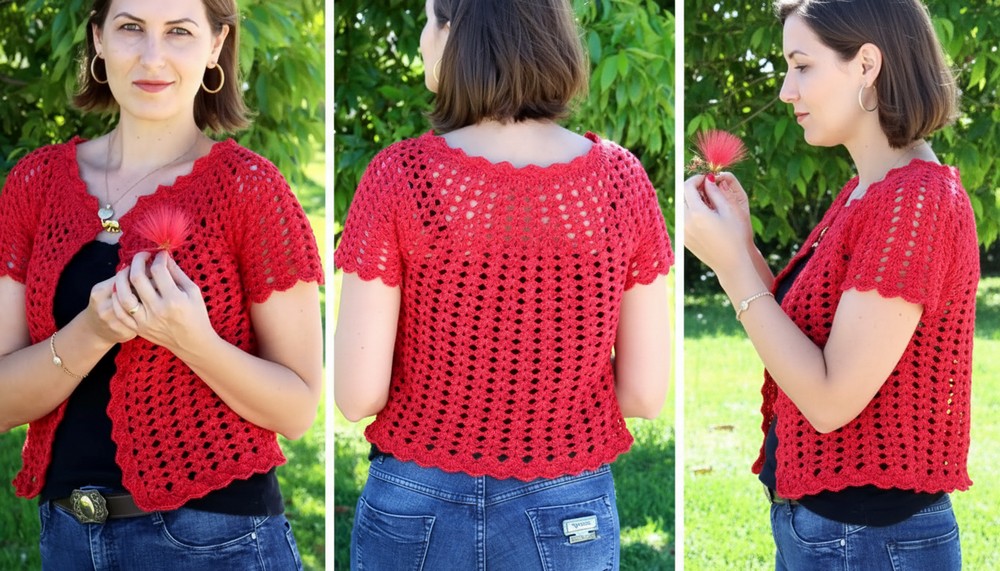
Are you searching for a beautiful layer to wear with many outfits? This crochet openwork bolero pattern is a wonderful choice for stylish comfort. Made with light and airy stitches, the bolero adds charm and a touch of elegance to dresses, tops, or even casual clothes. The lacy design looks delicate but is easy enough for many crocheters to make.
Summer Whisper Crochet Openwork Bolero Pattern Perfect for Layering

Because it is light and not too warm, you can wear it in different seasons or for special occasions. You can adjust the size, sleeve length, and how it closes to fit your own style. The open stitches help keep you cool, and the pattern lets you show off your crochet skills.
This bolero is also a thoughtful handmade gift for someone special. Simple, affordable, and versatile, it brings a lovely touch to your wardrobe and makes you feel proud to wear something you made yourself.


Certainly! Below is a step-by-step crochet pattern converted from your transcript for a beautiful openwork bolero. I have also included an introduction, a summary of its key features, level of difficulty, tutor’s suggestions, materials & tools, uses, and a practical tip at the end.
Crochet Openwork Bolero: Step-by-Step Pattern
Introduction
This airy and delicately lacy bolero is a versatile layering piece perfect for cool evenings or to add a touch of elegance to any outfit. Designed with simple V-stitch (V-point) and fan stitch, this project is accessible for both adventurous beginners and experienced crocheters. You can customize the size, sleeve length, and closure style—making it a flexible addition to your handmade wardrobe.
Special Features
- Adjustable Sizing: Easily adapt to measurements, with specific instructions for sizes S, M, L, G, and GG (XL).
- Elegant Lacy Pattern: Utilizes V-stitch and fan stitch for an open, airy texture.
- Versatile Closure: Wear it open-front, with a brooch, or tie with a chain.
- Customizable Sleeves: Make short or long sleeves as preferred.
- Easy to Lengthen: Add more rows for a cardigan-style version.
- Perfect for Various Yarns: Choose any yarn compatible with a 3mm hook.
Difficulty Level
Adventurous Beginner/Easy Intermediate
You should know:
- Foundation chains
- Double crochet (dc)
- Working in rows and rounds
- Simple increases
- Joining new yarn
- Basic finishing techniques
Tutor’s Suggestions
- Measure for the Best Fit: Always measure around your waist or neckline to set your base chain.
- Try it on mid-way: Adjust sleeve width before finalizing the division, for personalized fit.
- Space for Finishing: Leave about four finger-widths open at the front before the neckline finishing.
- Yarn & Hook: Use a 3 mm hook and a compatible yarn for the best texture.
- Adapt for Yarn Size: If your yarn/hook differs, chain to desired length using a measuring tape as reference.
Materials & Tools
- DK or Light Worsted weight yarn (amount varies by size; ensure you have extra for customizations)
- Crochet Hook: 3 mm (US D/3) or size for your yarn
- Scissors
- Tapestry needle (for finishing and weaving in ends)
- Measuring tape
- Brooch or button (optional, for closure)
Step-by-Step Pattern
1. Foundation Chain
- For Size M (standard): Chain 120 (approx. 58 cm).
- For S: 100 chains
- For L: 140 chains
- For G: 160 chains
- For GG(XL): 180 chains
- Tip: Always measure yourself and adjust number of chains to fit your bust or waist.
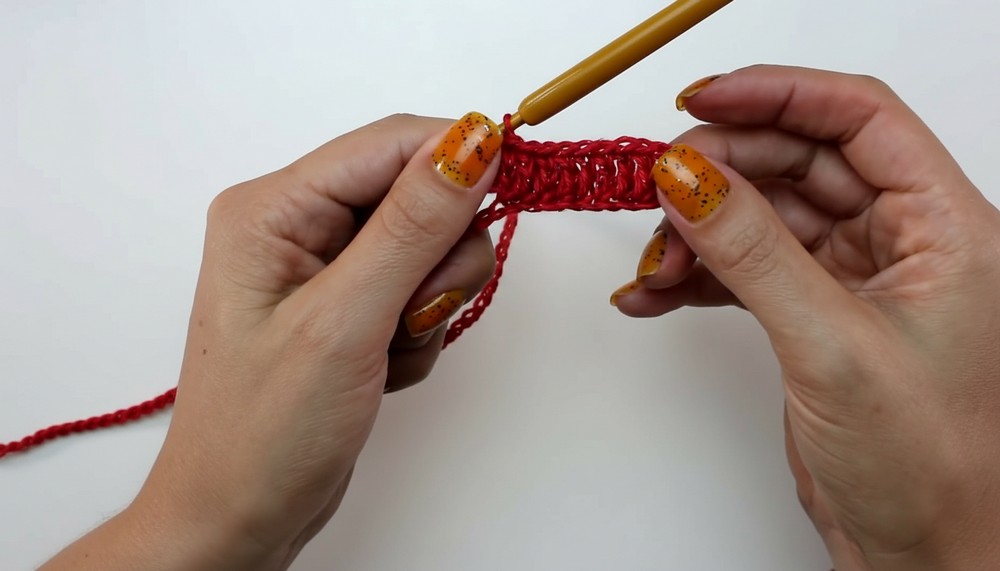
2. Row 1: Double Crochet Foundation
- Work one double crochet (dc) into each chain, skipping the first 3 chains as the turning chain.
- At the end, chain 3 and turn.
3. Row 2: V-Stitch Row
- V-stitch: (dc, ch 2, dc) in the same space.
- Skip one stitch between each V-stitch.
- Work a dc at the end, chain 3, and turn.
4. Row 3-4: Repeat V-Stitch Row
- Continue as in row 2, working V-stitch into chain-2 spaces of previous row. Repeat for two more rows (total of four V-stitch rows).
5. Increasing for Shoulders
- From the 5th row, increase every fourth V-stitch section by working 2 V-stitches in the same chain space.
- This increase is only done every fourth space, not at the ends.
- Continue in this manner for one row.
6. Rows after Increase
- Work the following row in regular V-stitch, without increases.
7. Create Deeper Lace (Triple V-Stitch)
- Next row: Triple V-Stitch across each V-stitch of the prior row:
- [dc, ch 2, dc, ch 2, dc] in each V-stitch space.
- Repeat this triple V-stitch row for three more rows (total: four rows of triple V-stitch).
8. Dividing for Sleeves and Body
- You’ll have 47 V-stitch sections (or stitches).
- Mark or separate as follows:
- Front (each): 6 V-stitch sections
- Sleeves (each): 10 V-stitch sections
- Back: 15 V-stitch sections
- Skip over the sleeve sections: When you crochet across the row, skip working into the sleeve chain spaces—this forms the sleeve opening.
9. Build the Body
- Continue to work back-and-forth in triple V-stitch rows over the body (fronts and back only, sleeves are on hold).
- Keep adding rows until you reach your desired length. For a bolero, about 17 rows is suggested, but add more for a longer cardigan.
10. Border/Finishing All Around
- Work a fan stitch border (Fan: 3 dc, ch 2, 3 dc in the same stitch) along the entire edge, including collar and hem.
- Along curved edge, alternate fans with single crochet to help lay flat.
- At corners, you may add extra stitches for a smooth turn.
11. Sleeve Construction
- Rejoin yarn at sleeve opening.
- Work in rounds: Triple V-stitch around the armhole (about 10 V-stitch sections).
- Continue for 5 rounds (for a short sleeve); add more for long sleeves.
- Finish with a round of fan stitch at the cuff.
12. Final Finishing
- Weave in all loose ends with a tapestry needle, working ends along the stitches for security.
- Attach closure if desired (brooch, button, or crocheted chain).
Uses
- Layer over dresses, tops, or camisoles.
- Elevate casual outfits.
- Suitable for year-round wear with appropriate yarn.
- Adaptable as a shrug, bolero, or cardigan.
TIP
Use stitch markers to mark front, back, and sleeve divisions before splitting for sleeves. This makes trying on and adjusting sizing much easier!
Conclusion
With its simple stitches, customizable sizing, and elegant design, this openwork bolero is an ideal project for anyone looking to expand their crochet wardrobe. Whether you keep it short and chic or long and cozy, you’ll love the handmade touch it brings to your ensemble. Tweak the length, sleeve, or finish to perfectly suit your style—and enjoy your new creation!
Happy crocheting!


Leave a Reply