Joy fills every stitch with this Crochet Amigurumi Dog Pattern, perfect for heartfelt gifts, décor, and keepsakes that delight all ages.
A single idea can spark something extraordinary, turning familiar materials into creations that hold a little piece of magic. What begins as an ordinary ball of yarn slowly becomes something full of character and charm, brought to life with care and imagination. Among these handmade treasures, few creations are as captivating as a tiny amigurumi dog, crocheted stitch by stitch, each one a small work of art.
Step-by-Step Guide Crochet Amigurumi Dog Perfect for Keychains

Thoughtful details bring these miniature companions to life: floppy ears, wide-eyed expressions, or even a tiny scarf tied just right. Small enough to fit in your hand, yet brimming with personality, they manage to feel both playful and elegant at the same time. Whether gifted to a loved one or kept as a special keepsake, these little figures carry a warmth that goes far beyond their size.
The process itself is just as meaningful as the outcome. It takes patience and focus to project something so intricate, turning repetitive movements into a quiet, meditative ritual. As the design takes shape, it becomes a reminder of the joy that can come from slowing down and creating something purposeful. These tiny dogs hold more than threads of yarn—they embody the love and care poured into every stitch.
Materials Needed
- Yarn: Royal blue, yellow, beige, and face-colored yarn (manta or similar).
- Hook: 1.25mm crochet hook.
- Safety Eyes: Size 5 (optional; can be substituted with embroidered features).
- Additional Supplies: Black sewing thread, glue, small buttons, and a needle.

Special Features
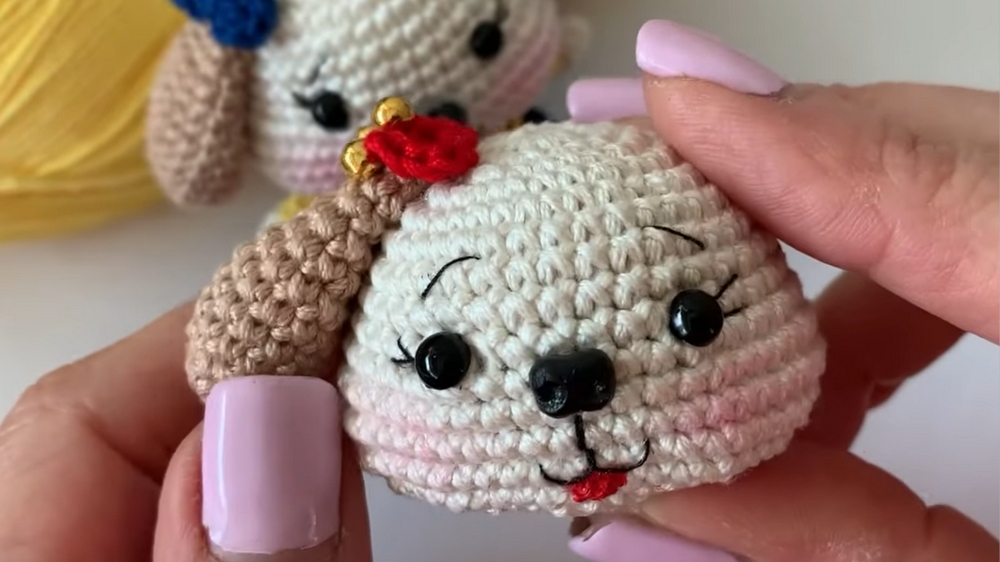
- Compact Design: The finished crochet dog measures approximately 8 cm, making it an ideal keepsake or decorative piece.
- Detailed Accessories: The dog features carefully crafted elements such as overalls, a bow, ears, a tongue, and eyelashes for added personality.
- Customizable Materials: The project allows flexibility in materials, such as yarn colors and thread types, enabling personalization.
Level of Difficulty
- Overall Difficulty: Beginner-friendly, but some components (like assembling parts and adding fine details) may require intermediate-level precision.
- Stitch Techniques: The pattern involves simple stitches such as single crochet, slip stitches, and decreases, along with specific design elements like forming a magic ring and shaping.
Tutor’s Suggestions
- Yarn and Hook Size: The instructor recommends using Eulali-brand yarn and a 1.25mm hook, which contributes to smaller and more intricate details.
- Adding Features: Use safety eyes, black sewing thread for the nose, and glue for attaching key elements like the ears and bow.
- Placement Advice: Align the safety eyes and nose carefully (the eyes between the ninth and tenth rounds and the nose slightly below). Use sewing thread to add fine details, such as the eyebrows and eyelashes.
- Stuffing: Fill the dog’s parts before assembly, particularly the head and body, for a smooth finish.
Step-by-Step Process
1. Creating the Head
- Start with a magic ring and eight single crochet stitches.

- Progressively increase stitches in subsequent rounds to shape the dog's head (e.g., eight increases, then alternating single crochets and increases).
- Add facial features like safety eyes, sewing thread details (eyebrows and eyelashes), and the nose.

2. Making the Ears
- Crochet six stitches inside a magic ring, followed by increases.
- Shape them by alternating single crochet and decreases, then attach them securely behind the head using glue.
3. Crafting the Arms and Legs
- For each arm, use six stitches in a magic ring and progress to eight stitches with color changes and slip stitches for definition.
- For the legs, opt for the same color as the ears and connect both legs with chains to start forming the body.
4. Creating the Body
- After connecting the legs, build the body by increasing and decreasing stitches. Add straps for the overalls and buttons for a completed look.

5. Final Assembly
- Sew or glue the body to the head carefully, ensuring alignment. Attach the arms and other details like the bow securely.
Uses
- Decorative Handmade Gift for loved ones.
- Collector’s Item for those who enjoy miniature crochet creations.
- Craft Project for practicing precision and mastering detailed crochet techniques.
Tip
Consider using pins to position details (nose, eyes, bow, etc.) to ensure symmetry before sewing or gluing them in place. This saves time and guarantees a polished result.
Conclusion
This 8cm crochet dog project combines creativity with approachable techniques, making it a delightful project for beginners and advanced crocheters alike. With proper materials, attention to detail, and the tutor’s helpful tips and suggestions, you can easily recreate this charming handmade design and showcase your crochet skills.


Leave a Reply