Dress your little one with this easy crochet baby skirt pattern that offers soft texture, pretty colors, and style for every special moment.
Little ones look even more adorable when dressed in a beautiful, handmade skirt that is both cozy and charming. Crochet baby skirt patterns let you craft special clothing filled with unique details like playful ruffles, floral designs, and pretty textures. These skirts can be made in any color you wish, whether you love bright, cheerful shades or soft, gentle pastels.
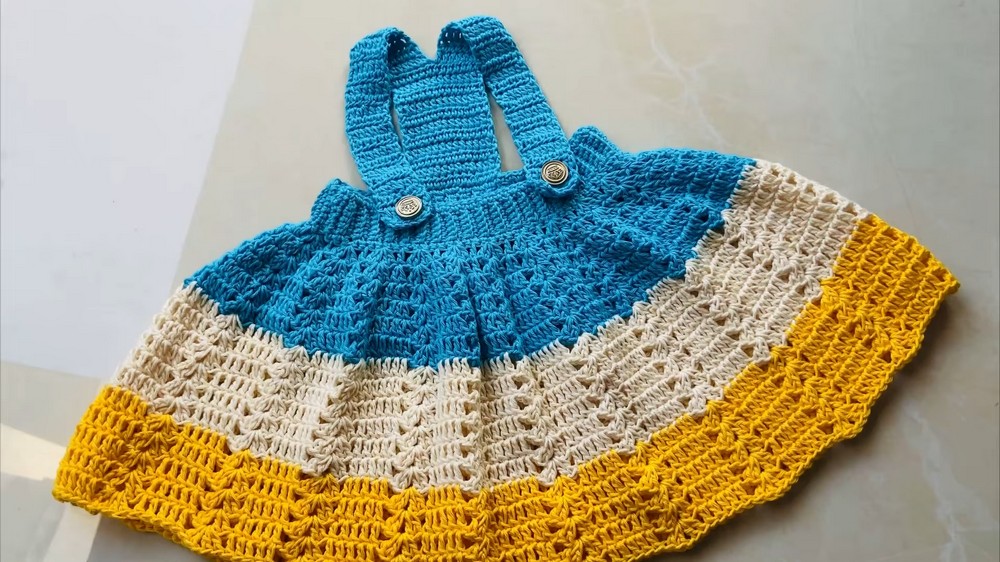
Sweet Crochet Baby Skirt Pattern for Precious Moments

Perfect for every occasion, use them for everyday comfort, special parties, church visits, or sweet family photos. The finished skirt is light, gentle on a baby’s skin, and easy to wash. Even if you are just learning, the simple steps involved mean anyone can create a thoughtful piece full of love.
This is a wonderful way to show care and creativity, making something that brings smiles and warmth to a baby’s day. Every little skirt becomes a treasured and stylish addition to a tiny wardrobe.
Project Overview
-
Difficulty Level: Advanced Beginner (requires knowledge of basic stitches and working in the back loop).
-
Special Features: Ribbed elastic-style waistband, layered color blocking, 3D flare construction, and adjustable straps.
-
Materials: 4-ply soft cotton yarn (Blue, Off-White, and Yellow used in video), 2.5mm crochet hook, measuring tape, 2 buttons, and stitch markers.
Step-by-Step Crochet Pattern
1. The Ribbed Waistband
The waistband is worked flat and then joined.
-
Foundation: Slip knot and chain 10 (approx. 2 inches). Adjust chain count for desired waistband width.
-
Row 1: Skip 1st chain, work 1 Single Crochet (sc) in each remaining chain. (9 sc).

-
Row 2 & Beyond: Chain 1, turn. Work 1 sc in the Back Loop Only (BLO) of every stitch. This creates the ribbed, elastic effect.
-
Continue: Repeat Row 2 until the band reaches the baby's waist circumference (e.g., 16 inches for 6–12 months).
-
Joining: Fold the band and join the ends using Slip Stitches (sl st). Turn the band inside out so the seam is hidden on the inside.

2. The Flare (Skirting)
Now work in rounds along the edge of the waistband.
-
Round 1 (Foundation): Chain 3 (counts as 1 dc). In the same space, work [1 dc, ch 1, 2 dc] (this is your first Fan Stitch). Skip 1 space, 1 dc in next. Skip 1 space, Fan Stitch in next. Repeat around.
-
Round 2 (Increase): In the center (ch-1 space) of every Fan Stitch, work a new Fan Stitch. On the single dc between fans, work 2 dc (increase).

-
Round 3: Fan Stitch in Fan Stitch center. Work 3 dc over the previous 2 dc (work 1 dc, then 2 dc in the last stitch).
-
Round 4 & 5: Continue increasing the solid dc sections by 1 stitch each round (to 4 dc, then 5 dc) while keeping the Fan Stitches consistent.
-
Round 6 (Non-Increase): Work a Fan Stitch in each fan and 1 dc in each of the 5 dc (no increase).
-
Color Changes: Fasten off the blue yarn. Attach the Off-White yarn and repeat the non-increase pattern (Fan + 5 dc) for 6 more rows. Finish with 5 rows of Yellow yarn.
3. The Straps & Bib
-
Bib Base: Attach yarn to the front waistband. Mark 14 stitches. Work Half Double Crochet (hdc) across these 14 stitches for about 4 inches.
-
Splitting for Straps: Split the 14 stitches into two sections of 7. Work hdc rows on the first 7 stitches until the strap is long enough to reach over the shoulder to the back (approx. 10–11 inches total). Repeat for the other 7 stitches.

-
Assembly: Sew two buttons onto the back of the waistband. The gaps between stitches on the straps will act as natural buttonholes, making them adjustable.
Tutor's Suggestions & Uses
-
Custom Sizing: The tutor emphasizes taking an accurate waist measurement first, as children’s sizes vary significantly even within the same age group.
-
Adjustable Fit: By placing the buttons on the back, you can cross the straps or wear them straight, and adjust the length as the baby grows.
-
Uses: This skirt is ideal for photo shoots, birthday outfits, or as a cozy everyday garment. You can also omit the straps to make a simple standalone skirt.
Pro-Tip
If you realize your waistband is slightly too short after finishing, don't frog the whole thing! You can add a border of single crochet around the top and bottom edges to gain an extra half-inch of width without restarting.
Conclusion
By combining a stretchy ribbed waist with a playful flared body, this skirt offers both comfort and style. Whether you stick to the three-color palette or go for a solid hue, the result is a professional-looking garment that showcases your crochet skills beautifully.


Leave a Reply