How to crochet Tassel Purse pattern for Unique Charm

Uses and Materials
Uses:
- Everyday accessory
- Summer outings
- Handmade gift option
Materials:
- Yarn: Choose your preferred yarn color and weight.
- Crochet Hook: Use the hook size suitable for your yarn.
- Sewing Needle: For joining panels and weaving in loose ends.
- Optional Tools: A DVD case or book to measure fringe length.

Special Features
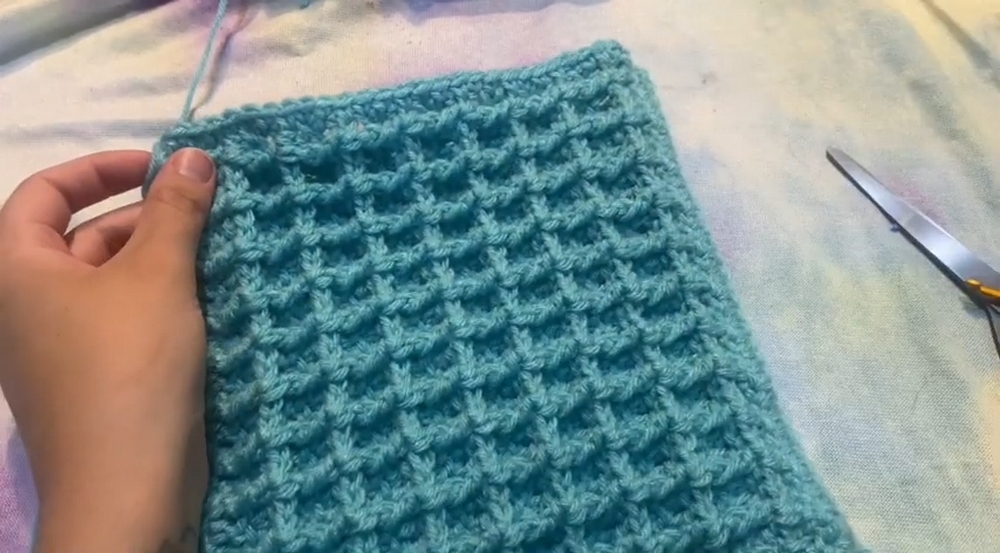
- Waffle Stitch Texture: Provides an elegant and unique 3D look to the purse.
- Customizable Design: Modify the size, colors, and strap length based on your needs.
- Polished Finishes: Clean edges and fringe tassels enhance the purse's aesthetic appeal.
- Versatile Usage: Can be worn crossbody or as an over-the-shoulder bag.
Level of Difficulty
Intermediate: While the waffle stitch itself is straightforward, sewing panels and adding the strap and fringe tassels require attention to detail. Beginners can follow along carefully with the tutorial, but prior knowledge of basic crochet stitches will be helpful.
Tutor's Suggestions
- Stretch the Strap: The tutor highlights the importance of accommodating for strap stretching during use, ensuring you measure accurately as you crochet.
- Consistency in Stitching: Maintain even tension throughout the project to create clean and polished panels.
- Finishing Tips: The tutor suggests using fire to lightly seal tassel ends to prevent fraying on acrylic yarn (use with caution).
Step-by-Step Details
Foundation Row:
- Chain a multiple of 4 plus 3; for this pattern, chain 35.

- Place a double crochet in the 4th chain from the hook, then double crochet across the row.
- Chain 3 and flip your work to start the next row.
Waffle Stitch Rows:
- Begin with a front post double crochet by working behind the rectangle bar on the stitch below.
- Follow the front post double crochet with a double crochet in the next two stitches.
- Repeat this sequence (front post double and two double crochets) across the row.

- Chain 3, flip your work, and alternate the stitch placement on the opposite row (reverse sequence).
Creating the Panels:
- Crochet until you have 8 rows of squares for one panel.
- Repeat the same pattern to create a second panel.
Joining the Panels:
- Align the wrong sides of the panels together.
- Use single crochet stitches to join both pieces along the edges.
- At corners, single crochet, chain 1, and single crochet again to round the edges.
- Work through spaces and bars for clean joins on uneven edges.
Polishing the Edges:
- Crochet single stitches along the top of the bag without closing it.
- Fit two single crochets into square spaces and one into the bar to give a polished finish.
Adding the Strap:
- Chain 4 and use Tunisian stitch techniques to create a strap of your desired length.
- Stretch the strap while crocheting to account for future stretching during use.

- Sew the strap to the panels securely, flattening ends for a flush attachment.
Adding Fringe Tassels:
- Wrap yarn around a tool (e.g., a book) four times to create tassel loops.
- Attach tassels at evenly spaced intervals on the bottom of the purse.
- Seal the ends using fire (optional) for clean, fray-free fringe.

Conclusion
This crochet tassel purse is a perfect blend of practicality and style. With its textured waffle stitch and tassel details, it makes an ideal accessory for casual outings. Following the tutorial step-by-step ensures your project is polished and professional, providing a satisfying result.
Tip
Test for Stretching: Before finishing the strap, gently stretch the fabric to simulate how it’ll feel when the bag is in use to avoid overly long straps once the purse is loaded.


Leave a Reply