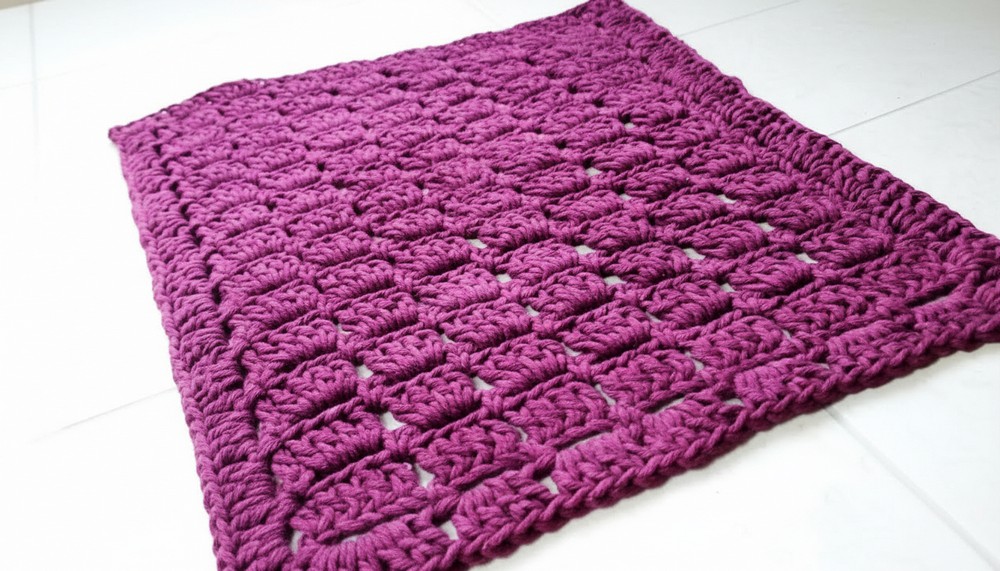
Transform your space with this Free Crochet Rug Pattern perfect for cozy floors, colorful décor, and playful textures that brighten any room.
Soft textures and vibrant designs enhance any living space with warmth and style. The Crochet Rug Pattern offers a versatile approach to home décor, providing a cozy foundation for bedrooms, living rooms, nurseries, or entryways. Its layered stitching and intricate patterns create depth and visual interest, while the choice of colors and shapes allows adaptation to any interior style, from modern minimalism to bohemian charm.
Stunning Statement Crochet Rug Pattern Everyone Will Admire

Beyond aesthetics, it delivers practical benefits, including comfort underfoot, noise reduction, and protection for flooring. The repetitive, structured rows encourage consistency and improve tension control, resulting in a sturdy, long-lasting piece.
Lightweight yet resilient, it can be easily washed and maintained, making it ideal for high-traffic areas. Finished rug bring a harmonious blend of function and beauty, transforming simple yarn into an inviting, tactile accent that enriches the ambiance of any room.
Special Features
- Graphic Texture: Alternating rows of clusters and chain arches create subtle lines and visual interest.
- Sturdy & Soft: Thick yarn and a 9mm hook make it plush, fast, and long-lasting.
- No Complex Stitches: Only basic stitches–ideal for new crocheters or a relaxing make.
- Customizable: Adjust width and length easily by changing starting chains or adding extra repeats.
Materials
- Euro Yarn (or similar chunky yarn) - about 1 kilo (color 1050, “embroidered,” 24-ply)
- 9mm crochet hook
- Tapestry needle (for finishing)
- Scissors
Difficulty Level
Beginner
Basic crochet skills required: chain, double crochet, and single crochet.
Pattern Steps
1. Foundation Row
- Chain 38. The stitch pattern is based on multiples of 5, plus 3. (35 + 3 = 38)
- (Tip: Finished width is approx. 46cm. To make a custom size, chain any multiple of 5, then add 3.)
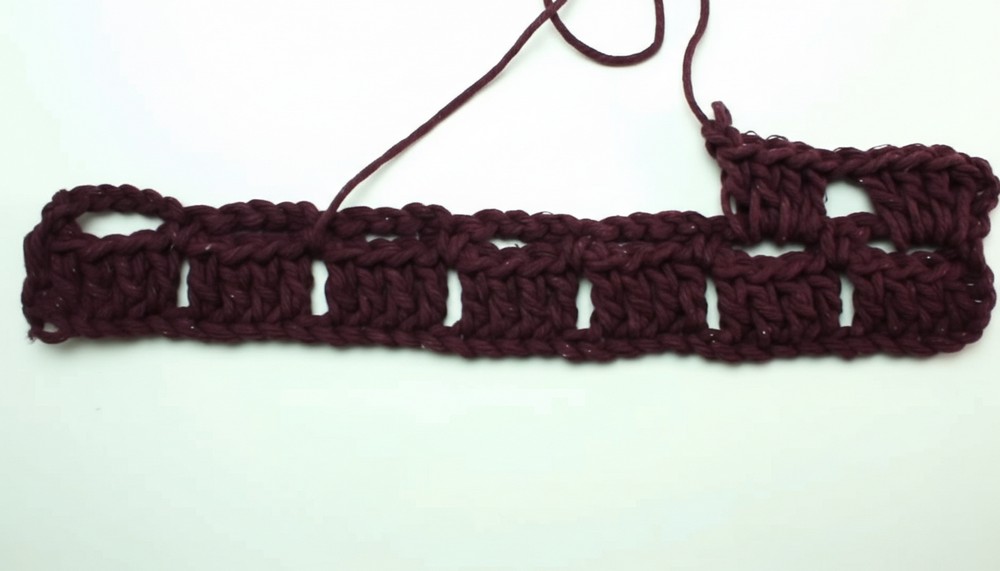
2. Row 1 (Cluster Groups)
- Skip the first 3 chains (count as first double crochet).
- Double crochet in the next 4 chains (5 double crochets in total, including the turning chain).
- Chain 1, skip next chain.
In the following 4 chains, work one double crochet in each (group of 4 double crochets). - Repeat: Chain 1, skip a chain, work 4 double crochets in the next 4 chains.
- Continue until the last 5 chains. Work 5 double crochets into these last 5 chains for a finished edge.
- Your first row ends with groups of 5 double crochets at each edge and groups of 4 in between, separated by chain-1 spaces.

3. Row 2 (Chain Arches)
- Chain 1, turn.
Single crochet in the first stitch. - Chain 4, single crochet in the next chain-1 space.
Repeat this sequence across the row: chain 4, single crochet in chain-1 space. - At the end, after your last arch, chain 4, single crochet in the top of the turning chain of the previous row.
4. Row 3 (Repeat First Row)
- Chain 3, turn (counts as first dc).
- Work 4 double crochets in the first chain-4 space (first group of 5, including turning chain).
- Chain 1, work 4 dc in the next arch.
- Repeat: Chain 1, 4 dc in next arch, until you reach the end.
- Work 5 double crochets (including starting chain) at each side edge.
5. Continue Alternating
- Repeat Row 2 and Row 3 until the rug reaches your desired length (sample: about 58cm).
- End with a Row 2 (chain arch row).
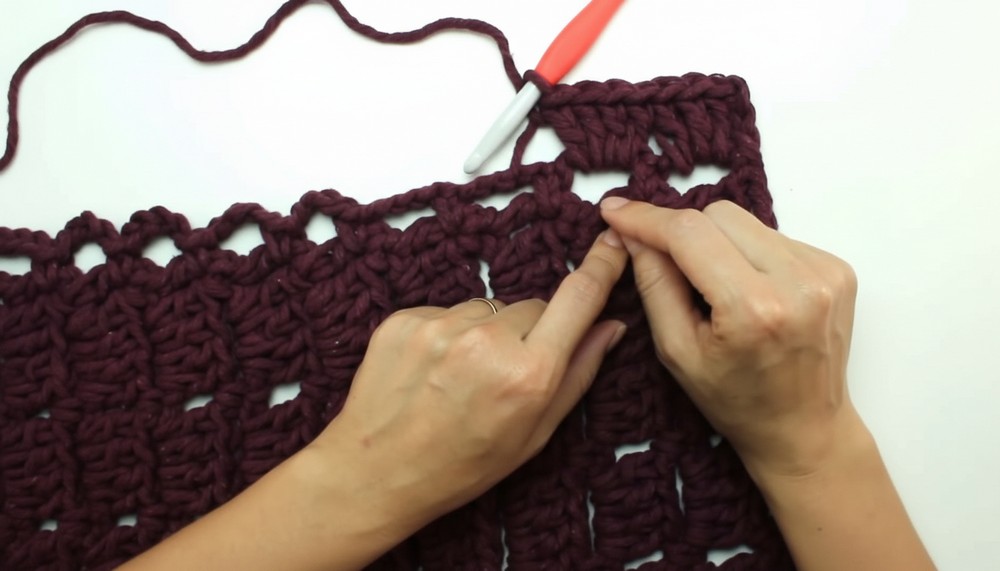
6. Final Edging
- Chain 1, turn.
Single crochet in first stitch. - Chain 4, single crochet between each group at the sides of the rug (into the spaces between rows for a neat edge).
- Corners: When you reach a corner, make a chain 4, single crochet directly in the corner to turn smoothly.
- Continue all around the rug for a clean border.
- Join to the first stitch with a slip stitch.
7. Last Border Round
- Slip stitch into the first chain arch to start.
- Chain 3, work 3 double crochets in same arch (4 dc total).
- Continue: In each chain-4 arch, work 4 double crochets.
- At the corners, create 4 double crochets for a smooth turn.
8. Finishing
- Weave in all loose ends with a tapestry needle, hiding them behind the work.
- Use the hook or needle to tuck in any thick or hard-to-hide ends securely.

Tutor’s Suggestions
- If your stitches are too loose, use groups of 3 dc instead of 4 in borders.
- Adjust the starting chain and repeats to build your rug to any size.
- The chunky yarn works up quickly and makes it easier to see mistakes—perfect for practice projects.
Uses
- Entrance or bedside rug
- Mat for bathrooms or kitchens
- Soft play mat for children
- Thick table runner
Tip
For perfectly tidy borders, block your rug flat after finishing to smooth out any wavy edges and even up your stitches.
Conclusion
You now have a plush, chunky crochet rug ready to warm up any floor space. This beginner-friendly design helps you build confidence and master basic stitches.


Leave a Reply