
Stand out on sunny days with this Free Crochet Flower Bucket Hat Pattern, bringing a fun and vibrant twist to your everyday outdoor style.
Celebrate sunny days with a charming accessory that fuses vintage inspiration and modern flair. This stylish Crochet Flower Bucket Hat Pattern transforms soft yarn and easy stitches into a hat adorned with blooming floral motifs, radiating effortless elegance and playful spirit. The flower-accented bucket style delivers flattering shade and comfortable fit, making it a favorite for outdoor adventures, festival outings, or simply relaxing in the garden.
Whimsical Crochet Flower Bucket Hat Pattern Everyone Will Love

Vibrant petals and classic structure ensure you turn heads while embracing practicality; the hat shields against the sun and stays breathable in warmer weather. Versatile for all ages and fashion tastes, this treasure complements casual outfits or adds a delightful touch to special occasions.
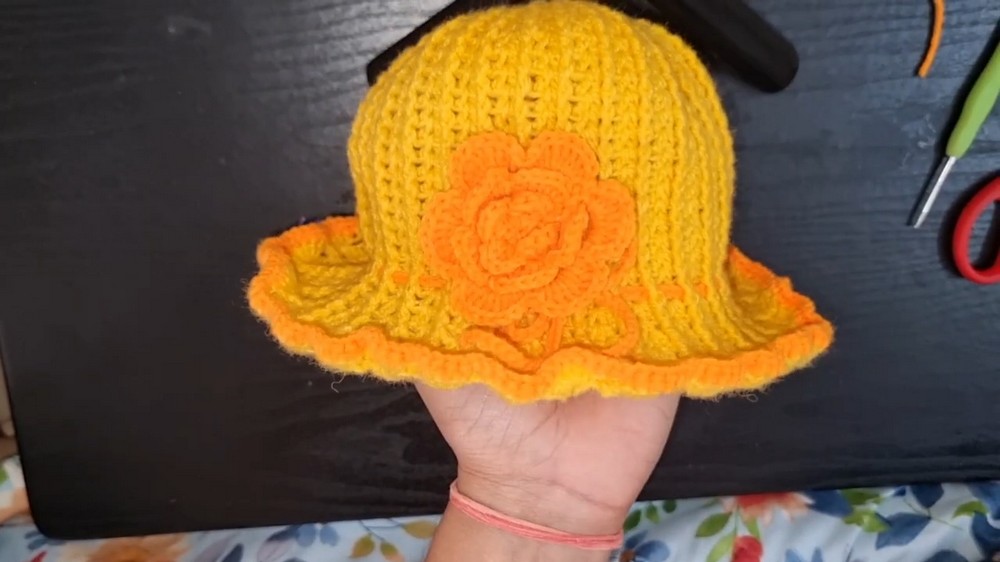
Beginners and experienced crocheters alike enjoy bringing the pattern to life, exploring endless color combinations that reflect personal style. In today’s world of creative self-expression, crocheting this unique accessory offers relaxation and soulful satisfaction, resulting in a wearable art piece that's as functional as it is beautiful.
Materials Needed
- Acrylic or cotton yarn (Yellow, Orange, and any two favorite accent colors)
- 2 mm crochet hook
- Yarn needle
- Stitch marker
- Scissors
Pattern Features
- Customizable Sizing: Easily adjustable for different head sizes, simply alter tension or use thinner/thicker yarn.
- Three-Layer Crochet Flower: Unique and decorative, giving the cap a standout look.
- Drawstring Cord: Ensures a snug fit and decorative finish.
- Simple Construction: Made in rounds; great for practicing basic crochet stitches and working in the round.
- Beginner to Intermediate Level: If you’ve practiced magic ring, double crochet, and front post double crochet, you’ll enjoy this pattern!
Step-by-Step Pattern
1. Start the Crown
- Magic Ring: Make a magic ring with your main cap color.
- Chain Three (Counts as first double crochet).
- Mark the third chain with a stitch marker.
- Round 1: Work 14 double crochets into the ring (15 stitches including initial chain-3).
- Pull the ring tight to close the center.
- Slip stitch to the marked third chain to close the round.

2. Building the Cap Body
- Round 2:
- Chain 3.
- Alternate: Front post double crochet (FPdc) into every double crochet from the previous round, with a regular double crochet in each following space.
- End the round with a slip stitch in the third chain.
- (Now you’ll have 30 stitches.)
- Round 3:
- Chain 3, mark the third chain.
- FPdc into each FPdc, double crochet in next space around.
- Repeat to complete the round.
- Continue Rounds:
- Repeat the established pattern: For each round, FPdc in every FPdc, double crochet in the next space.
- After a few rounds, the body will start to form—the more rounds, the deeper your cap.
- Increase for size: For a larger cap, crochet more rounds and use looser stitches or thicker yarn, for smaller, tighten tension or use thinner yarn.
3. Forming the Cap Sides
- Begin the body’s “increase” section as follows:
- Work two double crochets between FPdc stitches.
- Next round: Work three double crochets in between.
- Continue adding an extra double crochet between each as the cap grows (up to five double crochets between FPdc for a more spacious, beret-like style).

4. Final Rounds and Drawstring Edge
- Finishing Edge:
- Choose a contrasting color.
- Join yarn and single crochet in each stitch around the brim. Slip stitch to finish.
- Fasten off, weave in the ends.
- Drawstring Cord:
- With accent color, chain a string (slightly longer than the cap’s circumference).
- Use a yarn needle to weave the cord in and out around the base of the cap, about 7–8 rows above the edge.
- Tie ends into a bow or knot.
5. Three-Layer Crochet Flower Motif
- First Layer (Center):
- Magic ring, chain 4, single crochet (sc) into ring, chain 3, sc into ring; repeat for a total of four loops.
- Slip stitch to finish, pull tight.
- Second Layer (Petals):
- For each loop: Single crochet, chain 1, 3 double crochets, chain 1, single crochet in same loop.
- Repeat for all loops for four petals.
- Third Layer (Back Petals):
- Chain 4, single crochet from the back into the base behind each petal.

- Continue around; you’ll form 5 space “loops.”
- In each space: chain 1, 5 double crochets, chain 1, single crochet—repeat for five petals.
- Chain 4, single crochet from the back into the base behind each petal.
- Fourth Layer (Optional for fluffier petals):
- Chain 5, single crochet from the back in the base of each petal (around).
- In each space, chain 1, 7 double crochets, chain 1, single crochet for thicker petals.
6. Attach Flower to Cap
- Use the yarn needle and leftover tail to sew the flower to the side or center front of the cap.
- Weave in all ends carefully.

Tutor’s Suggestions
- Adjust the cap size using different hook sizes or yarn weights.
- To create a party look, make the cap a bit looser and add extra flower layers.
- For a snug cap, stick with smaller hooks and tight stitches.
- The project is ideal for practicing front post double crochet and basic flower motifs.
Uses
- Perfect for gifting!
- Great for everyday wear, parties, or as a photo prop.
- A fun stash-buster for colorful yarn leftovers.
Pro Tip
When weaving in your ends, secure knots at the back neatly so your cap stays strong and the inside looks clean. For added security, double the flower yarn tail and weave in multiple directions.
Conclusion
With cheerful colors and a decorative flower, this crochet cap is sure to become a favorite accessory for little ones. The pattern’s flexibility means you can personalize each cap for a truly special handmade touch. Happy crocheting!
You can adjust the cap for any age, and playful color changes will keep each creation fresh and fun!




Leave a Reply