Refresh your summer wardrobe with a breezy look by using this Free Crochet Crop Top Pattern for a fun and stylish warm-weather essential.
Effortlessly elevating warm-weather style, this playful yet sophisticated garment offers a unique blend of comfort and customization. With endless possibilities for color, stitch, and fit, it allows a maker to easily reflect personal taste while enhancing any casual or festival wardrobe. Present trends see this top paired with everything from high-waisted jeans to breezy skirts, making it a versatile staple for summer adventures or beach days.
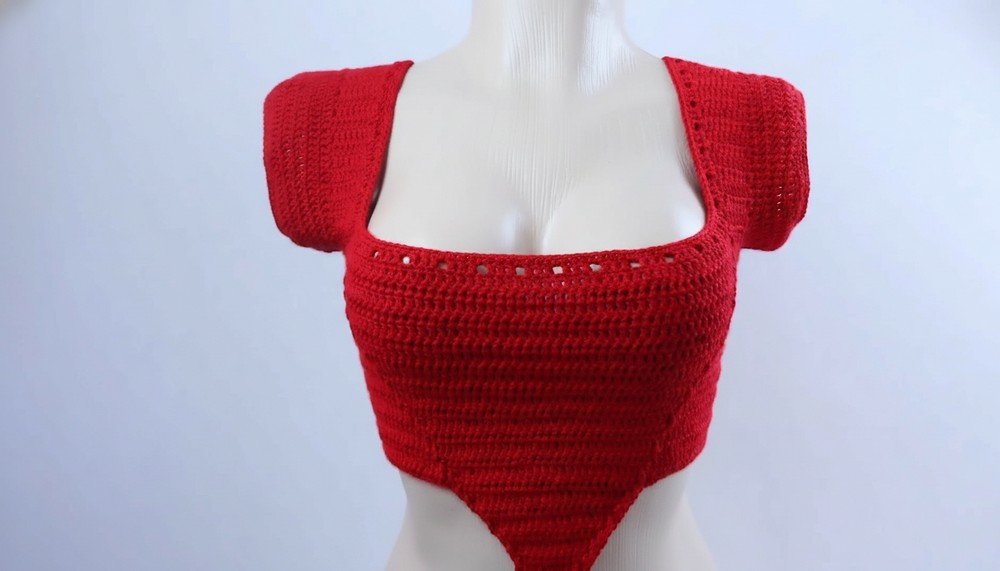
Retro Crochet Crop Top Pattern You’ll Love to Wear

Thanks to a crochet crop top pattern, the lightweight and breathable nature of the fabric ensures cool comfort even during the hottest months, while the handmade quality adds a special touch to every look. Quick to make and requiring minimal supplies, this pattern is accessible to beginners and enjoyable for seasoned crocheters alike.
Whether crocheted for personal wear, as a thoughtful gift, or for boutique display, each piece radiates individuality and modern flair, embodying the charm and practicality that make handmade fashion so enduringly appealing.
Materials Needed
- Yarn: Any kind, shown here in 100% acrylic
- Crochet hook: 2 mm (smaller than recommended for your yarn)
- Measuring tape
- 2 stitch markers (or scrap yarn)
- Wool needle
- Scissors
Special Features
- Textured relief (post) stitches for visual interest
- Custom-fit sizing
- Open-back with decorative buttonholes and braided closure
- Adjustable sleeves
- Easy-to-follow repeat rows
Level of Difficulty
Beginner to Intermediate
If you know basic double crochet and want to try post stitches, this project is perfect for you. The clear step-by-step instructions make it accessible to confident beginners.
Tutor’s Suggestions
- Measure as you go for the best fit
- Use markers or yarn scraps to mark sleeve placements
- Customize length, width, and opening in the back to suit your style
- Hide loose strands as you crochet
Uses
Wear your crochet crop top to summer parties, music festivals, or pair it with jeans or skirts for a casual, chic look. Layer it over a dress or tank for extra flair.
Step-by-Step Pattern
1. Preparation
- Separate about 2 meters of yarn and set aside for later.
- Gather all materials.
2. Foundation
- Make a slip knot.
- Chain 3 for all sizes.
- Yarn over, and in the first chain, crochet a double crochet.
- You now have 2 double crochet (the starting chain counts as one).

3. Shaping the Triangle
- Chain 2, turn.
- Continue from bottom up, alternating increases at both ends.
- Make an increase: Crochet two stitches into one at each end.
- Repeat increases at corners, always working into the second chain for each increase.
4. Building Rows
- Continue adding rows, always chaining 2, turning, and increasing at both ends.
- With each row, follow this pattern:
- Double crochet in each stitch across.
- Make increases at each end.
- Use the chain as your turning point.
- In the third row, you should have 6 double crochet.

5. Textured (Relief) Stitch Rows
- Begin adding relief stitches for texture using front post double crochet (FPdc) and back post double crochet (BPdc).
- On one row: FPdc in the second stitch from the end.
- Next row: BPdc in the second stitch from the end.
- Continue alternating these post stitches in each row to achieve the relief effect.
- Repeat this pattern until your work measures the desired length:
- Size S: 9 cm (about 11 rows)
- Size M: 10 cm
- Size L: 11 cm
- Size XL: 12 cm
(or as long as you prefer)
6. Expanding for Bust Coverage
- Chain a long strand (quantity varies per size and opening)—measure it stretched for the back opening.
- Example: 60 chains = 27 cm (for S)
- M: 28 cm, L: 29 cm, XL: 30 cm
- Use the reserved yarn to create another chain of the same length for the opposite side.

7. Working Across the Chains
- Starting on the third chain from the hook, double crochet across.
- Continue to add relief stitches to maintain the texture.
- Repeat rows without increasing, alternating post stitch patterns until your work covers the bust:
- Size S: 18 rows = 15.5 cm
- M: 16.5 cm
- L: 17.5 cm
- XL: 18.5 cm
8. Shaping Sleeves
- Use markers to designate where sleeves begin.
- Measure approx. 7-8 stitches for sleeve width (about 4 cm).
- Add chains and double crochet to create the shoulder straps. Make sure they reach the front.
- Size S: 32 cm (35 rows), M: 33 cm, L: 34 cm, XL: 35 cm
- Attach with the wool needle and ensure alignment. Repeat for the second sleeve.
9. Crocheting Sleeves
- Slip knot, chain 2, double crochet over each stitch.
- Continue for desired length (S: 5 rows = 5 cm, M: 6 rows, L: 7 rows, XL: 8 rows).
- Finish sleeve edge with rounds of single crochet.
- If the sleeve is too wide, decrease every 10 stitches in the second round of single crochet; decrease every 5 stitches in the third round if needed.
10. Creating Buttonholes
- Chain 2, then work the buttonhole pattern: 3 double crochet separated by a chain, skipping a stitch between groups.
- Repeat across the back and front.
- Go back across with single crochet, working into each stitch and hole.

11. Braided Back Closure
- Make a chain strand (about 4 meters) with 2 strands of yarn.
- Braid and thread through the buttonholes, matching holes for even closure.
12. Finishing Touches
- Hide all loose ends and strands using a wool needle.
- Adjust fit as needed by tightening the back closure.
Conclusion
You now have a custom-fit, textured crochet crop top with chic open-back details and adjustable sleeves. Once you’re comfortable with the relief stitches, you’ll find this project quick and easy to work up!
Helpful Tip
Keep measuring as you crochet. Customization is the key to a perfect fit! If you want extra flair, consider adding beads or tassels to the back closure.


Leave a Reply