Update your trendy outdoor look right now with this Crochet Bucket Hat Pattern for a cool and comfy accessory that fits every sunny adventure.
Wearing a cool and trendy headpiece adds a touch of modern flair to your favorite summer outfits. This Crochet Bucket Hat Pattern helps you form a soft and sturdy shape that protects your face from the bright sun while staying light on your head. Since the brim is wide and flexible it offers great shade and keeps you feeling fresh during a long walk or a day at the beach. You can easily fold it into your pocket or wear it to make a simple look feel much more stylish and fun.
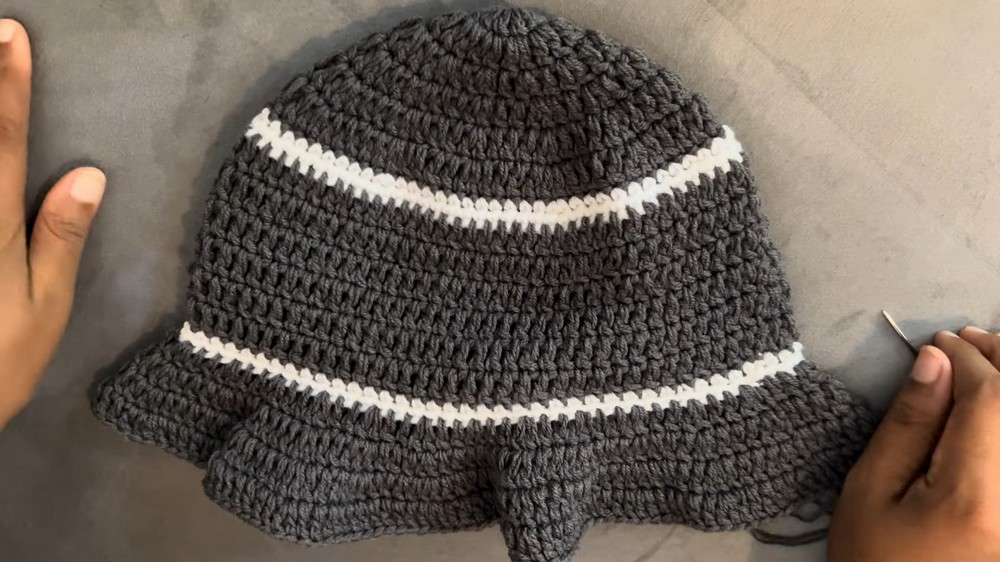
Cheerful Crochet Bucket Hat Pattern for Handmade Adventures

Working with your hands in this way is very peaceful and helps you feel steady and happy throughout the day. This Crochet Bucket Hat Pattern is a smart way to turn soft yarn into a high-end accessory that fits your style perfectly.
The final look is very clean and professional which makes you stand out in a crowd. It is a wonderful way to feel cozy and cool while sharing your unique sense of fashion.
Special Features
- Double-stranded technique for a chunky, full look.
- Seamless construction—worked from the top down in the round.
- Eye-catching color changes for a modern, unique finish.
- Wide, flared brim for sun coverage and style.
- Minimal sewing—just weave in ends!
Level of Difficulty
Easy / Absolute Beginner: Uses only double crochet and single crochet with basic increases. No advanced shaping or complex stitches.
Tutor’s Suggestions
- Always end your increase rounds with two stitches together for an even and neat finish.
- Use a stitch marker to keep track of your starting stitch for each round.
- Weave in your color changes securely at the back for a tidy hat.
Uses
- Everyday casual wear
- Sun protection with style
- Great as gifts or a market seller favorite
Materials Needed
- Medium or chunky weight yarn (two colors; use double strands for thickness)
- 4.5mm crochet hook
- Scissors
- Measuring tape
- Stitch markers
- Tapestry needle
Step-By-Step Pattern
1. Top of the Hat (Make Crown)
- Make a magic ring. Chain 2 (does not count as a stitch).
- Work 12 double crochets (DC) into the ring.
- Tighten ring, slip stitch (SL ST) to first DC to close the round.

- Tighten ring, slip stitch (SL ST) to first DC to close the round.
2. Expand the Crown (Rounds 2–6)
Round 2
- Chain 2.
- Put 2 DC into each stitch around (24 DC).
- Slip stitch to join.
Round 3
- Chain 2.
- (1 DC in next stitch, 2 DC in following stitch), repeat around (36 DC).
- Slip stitch to join.
Round 4
- Chain 2.
- (1 DC in next two stitches, 2 DC in following stitch), repeat around (48 DC).
- Slip stitch to join.
Round 5
- Chain 2.
- (1 DC in next three stitches, 2 DC in following stitch), repeat around (60 DC).
- Slip stitch to join.
Round 6
- Chain 2.
- (1 DC in next four stitches, 2 DC in following stitch), repeat around.
- Slip stitch to join.
- Check crown size with your measuring tape: Target about 7 inches diameter for adult fit. For larger hats, continue with further increase rounds: (e.g., 1 DC in next 5 stitches, 2 DC in following, etc.)

3. Color Change and Transition
- At the end of desired crown size, change to your contrast color (ex: White):
- On your joining slip stitch, pull new yarn through.
- Cut and secure old color at the back by tying ends together.
- Chain 1 (as you will now work single crochet).
4. Transition Row (Contrast Band)
- Work one round of single crochet (SC):
- (SC in next 11 stitches, 2 SC in next stitch), repeat around.
- This is your last increase round!
- Slip stitch to join.

5. Create Body of Hat
- Next round: No increases.
- Chain 1, SC in each stitch around.
- Join with slip stitch.
- Change back to original color (repeat color change method).
- Now work all rounds in double crochet (DC), no increase:
- Chain 2, DC around. Join with slip stitch.
- Continue for 5–6 rounds, or until hat body measures about 3 inches.

6. Contrast Band (Optional)
- Switch to contrast color and make 2 rows single crochet (no increases).
- Add as a design accent.
7. Brim of Hat
- Switch back to main color.
Brim Row 1
- Chain 2.
- (DC in next 2 stitches, 2 DC in next stitch) repeat around.
- This forms a gentle flare.
- Slip stitch to join.
Brim Row 2
- Chain 2.
- (DC in next 3 stitches, 2 DC in next stitch) repeat around.
- Slip stitch to join.
Brim Row 3
- Chain 2.
- (DC in next 4 stitches, 2 DC in next stitch) repeat.
- Slip stitch to join.
Brim Row 4 (optional, for extra width)
- Chain 2.
- (DC in next 5 stitches, 2 DC in next stitch) repeat.
- Slip stitch to join.
- Finish: Fasten off and use a tapestry needle to weave in all ends on the hat’s inside.
Finishing
- Use your tapestry needle to neatly weave in all yarn ends, securing them so they won't peek through to the front.
- Check your hat fits! Try it on and admire your handiwork.
Conclusion
You’ve made a classic, chunky, trendy bucket hat that is practical and fun. Customize the colors, brim width, and even try adding flowers or pins for your personal style.
Tip
Use double strands of yarn for a fast, thick project—but make sure your stitches are not too tight, so the hat stays soft and comfortable.


Leave a Reply