
Show off cozy style with this Free Crochet Scarf Pattern perfect for chilly days, comfy layering, and adding charm to your favorite outfits.
Keeping cozy and looking sharp during the cold months is very easy when you have a lovely, handmade wrap to wear. This Crochet Scarf Pattern is your key to making a fancy accessory that makes a simple outfit look very expensive and polished. It is a great choice to use as a thick wall against the cold wind or as a soft, pretty layer for a walk on a cool night.
Ripple Crochet Scarf Pattern for Layered Style Looks

The finished piece has a very graceful feel, with a thick and textured look that feels like a warm hug. Since the shape is long and easy to move, you can wrap it in many styles to fit how you feel each day.
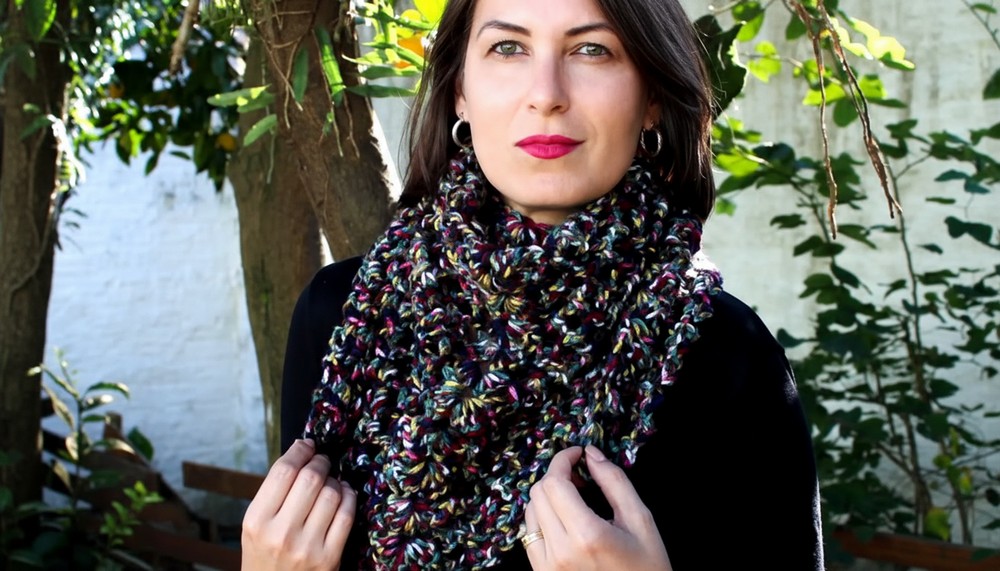
It is a very clever idea for a sweet gift because it shows a lot of love and quality that shop-bought items just don't have. Making this piece gives you a stylish, strong item that keeps you feeling good and warm.
Special Features
- Elegant shell stitch gives great visual effect.
- Adjustable size—make as a scarf or shawl!
- Works up quickly with thick yarn and large hook.
- Suitable for beginners and experienced crocheters.
- Versatile design for any season.
Level of Difficulty
Beginner-friendly: Uses just chains, slip stitch, single crochet, and double crochet. Repeats simple steps every row.
Tutor’s Suggestions and Uses
- If you want a bigger piece (like a shawl), simply repeat more rows.
- Use color-blended or textured yarn for added interest.
- Add fringe, tassels, or other edging for personal flair.
- Great for gifts or selling—everyone loves a handmade scarf!
Materials
- Two skeins of Da Couto color 550 (100% acrylic, 100g/120m each; or similar thick yarn)
- 5mm crochet hook
- Tapestry needle for finishing
- Scissors
Step-by-Step Pattern
1. Foundation
- Make initial loop.
- Chain 6.
- Join in a round with a slip stitch to the first chain.
2. Row 1 (Begin Shell)
- Chain 3 (counts as first dc), chain 1 (for space).
- Work 3 double crochet (dc) and then 4 dc into center of ring.
- Chain 3, work 4 dc into center of ring.
- Chain 1, work 1 dc in the ring.

3. Row 2
- Chain 3 (counts as dc), chain 1 (space).
- In chain-1 space: work 3 dc.
- Chain 2, in next space at edge: work 4 dc.
- Chain 3, work 4 dc again.
- Chain 2, in next chain space: work 3 dc.
- Chain 1, work 1 dc in chain space.

4. Following Rows (Repeat Growing Shells)
- Always start with chain 3 (dc), chain 1 for space.
- In first space: 3 dc.
- Continue: chain 2, dc in each of the last group’s edge dc, across the row for each shell group.
- At the center shell: chain 3, work 4 dc, chain 3, work another 4 dc.
- Work the other side as the mirror of the first.
- End with 3 dc, chain 1, dc in last space.
- Repeat until you have a total of 19 rows.

5. Edging/Finishing Row
- At end of last row, start finishing as follows:
- Chain 3, work 1 dc in same space.
- Next space: single crochet (sc).
- Chain 3, 1 dc in same space, next space: slip stitch (sl st).
- Continue: chain 3, 1 dc, next space: sc or sl st alternating, all the way around the edge.
- In the tip/corner, keep four dc together, chain 3, four dc together.
- For each space along the edge, repeat the beak pattern for decorative finish.
6. Weave in Ends
- Cut the yarn, leaving a long tail.
- Thread tapestry needle and weave tail securely through stitches on the back side.
- If you changed yarns, hide those ends in the same way, being careful to do so at the dc groupings, not chain spaces, so ends stay hidden.

Conclusion
You’ve made a colorful shell stitch scarf (or shawl if you added rows), perfect for chilly days or as a stylish accent. This beginner-friendly pattern gives high impact with minimal effort.
Tip
When changing yarn skeins, join and weave in new ends at the groups of double crochet, not chain spaces. This keeps your work looking tidy and professional.




Leave a Reply