
Effortlessly add the Glover Stitch to your crochet repertoire with this comprehensive, step-by-step Easy Crochet Glover Stitch Tutorial.
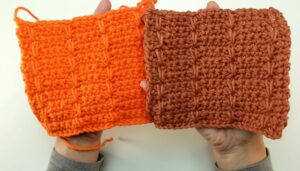
The Glover Stitch is a captivating crochet technique that stands out for its distinctive texture and versatility. It's a discovery that adds depth and interest to various crochet projects, from cozy blankets to chic accessories. What sets this stitch apart is how it looks different from multiple perspectives, offering a dynamic visual appeal to any item it graces.

Easy Crochet Glover Stitch
Appearance and Look of the Glover Stitch
Symmetrical and Versatile Design:
- Double-Sided Symmetry: The Glover Stitch boasts a symmetrical appearance on both the front and back sides, making it ideal for projects where both sides are visible, such as scarves, blankets, and reversible garments.
Aesthetic and Creative Appeal:
- Artistic Beauty: The Glover Stitch is celebrated for its aesthetic charm, combining intricate patterns with a pleasing texture that adds depth and dimension to any crochet piece.
- Inspiring Creativity: This stitch encourages crocheters to experiment with texture and design, pushing the boundaries of traditional crochet work and inspiring innovative project ideas.
For All Skill Levels:
- Beginner-Friendly: While beginners can appreciate the straightforward process of the Glover Stitch, it also provides a new technique for seasoned crocheters looking to expand their skill set.
- Skill Enhancement: Mastering the Glover Stitch can significantly enhance your crochet repertoire, opening up a range of new possibilities and creative endeavors.
Conclusion
The Glover Stitch offers a symmetrical and visually appealing design that is perfect for projects where both sides are shown. Its beauty and versatility inspire creativity among crocheters of all levels, making it a valuable technique to add to your crochet skills. With its unique texture and appearance, the Glover Stitch can transform your crochet projects and unlock new potentials in your craft.
Materials
- Use yarn of your choice, but a bulkier yarn may enhance the stitch's texture.
- Crochet hook size will depend on yarn weight.
Starting Your Project
- Start with a loose chain in multiples of two. If necessary, use a bigger hook for the starting chain to ensure it's loose.
Foundation Chain
- After chaining in multiples of two, add one more chain.

Row 1: Starting the Glover Stitch
- Insert your hook into the second chain from the hook.
- Yarn over and pull up a loop.
- Yarn over again and insert the hook into the next stitch, pull up another loop. (Four loops on hook)
- Yarn over and pull through all four loops on the hook.
- Chain one.
Row 1: Continuing the Pattern
- Insert the hook into the very next stitch and pull up a loop (two loops on hook).
- Yarn over and insert hook into the following stitch, pull up a loop (four loops on hook).
- Yarn over and pull through all four loops on the hook.
- Chain one.
- Continue this pattern across the row.
Ending Row 1
- At the end of the row, after pulling through the last four loops, chain two instead of one before turning your work.
Row 2 and Beyond: Creating Texture
- The two chains at the end of the previous row count as the first stitch of the new row.
- For the first stitch, insert the hook into the front loop only of the first chain and pull up a loop.
- Then, yarn over and go under both loops of the next big stitch (four loops on hook), yarn over and pull through all loops, chain one.
- Continue going through front loop only, yarn over, then go through both loops, yarn over, pull through all loops, and chain one.
- Repeat this pattern until the last stitch.
Ending Each Row
- After the last stitch of each row, remember to chain two before turning.
Repeat for Pattern
- Repeat the pattern from "Row 2 and Beyond: Creating Texture" until your project reaches its desired size.

Conclusion:
- This Glover Stitch creates textured fabric that looks pleasing from every angle and has symmetry on both sides.
Leave a Reply