Whip up a burst of happiness using this Free Crochet Flower Pot Pattern and stitch adorable, everlasting flowers that brighten every corner.
Bringing a touch of handcrafted charm and whimsy to any space, this creative project offers a delightful way to showcase a flower that never fades. With its vibrant color and intricate texture, a crochet flower pot transforms an ordinary vessel into a captivating decor accent, perfect for brightening up a desk, windowsill, or gifting to a loved one. Whether styled as a standalone piece or as the centerpiece of a cheerful display, it highlights the remarkable art of crochet, blending cozy tradition with contemporary flair.
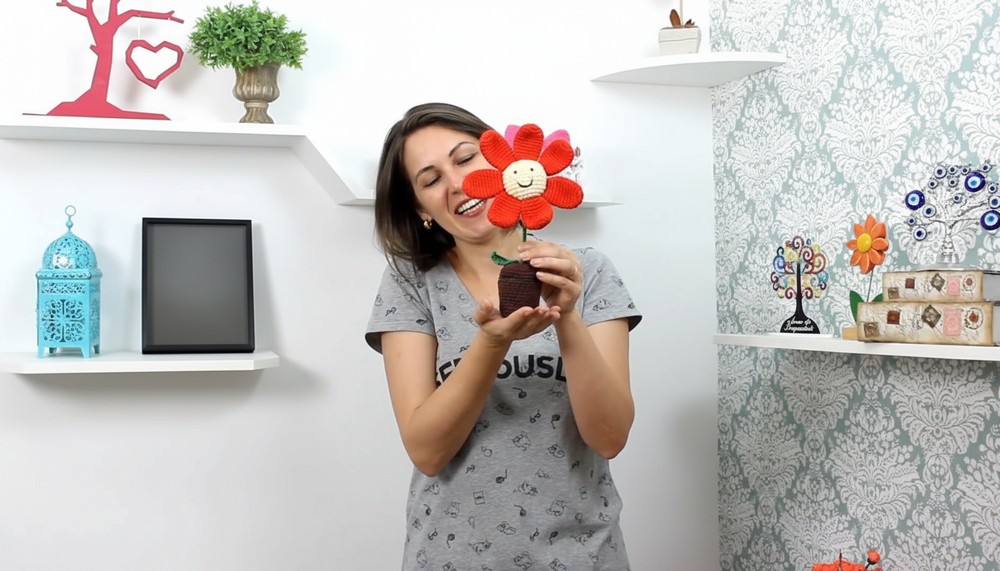
Summer Crochet Flower Pot Pattern to Bring Sunshine Indoors

The process encourages relaxation, creativity, and skill-building, making it an enjoyable experience for both beginners and seasoned crocheters. Versatile in use, this charming item can serve as a centerpiece, a personalized gift, or a playful addition to a nursery or office.
Presenting a sustainable and reusable alternative to real plants, the crochet flower pot pattern adds enduring beauty and a personalized touch to any interior, perfectly reflecting the maker’s heart and artistry.
Special Features
- Amigurumi flower: Stand-alone, keeps its shape with a sturdy stem and weighted pot.
- Expressive face: Add personality with crocheted cheeks, 5mm safety eyes, and an embroidered smile.
- Removable pot cover: Customize and protect your mini vase.
- Realistic structure: Barbecue stick stem, textured leaf, and sewn petals for a charming floral effect.
Level of Difficulty
Intermediate
You’ll need to know:
- Magic ring
- Single crochet (SC), half double crochet (HDC), double crochet (DC), slip stitch (SS)
- Invisible decrease
- Spiraling rounds
- Basic amigurumi sewing techniques
- Working with safety eyes/tapestry needle for face details
Tutor’s Suggestions
- Mark your rounds with pins or a contrasting yarn for accurate counting.
- Use leftover yarns for a sustainable project; select fresh, vibrant colors for petals.
- Glue safety eyes securely. If lacking locks, use hot glue for stability.
- Fill the flower face and base firmly with silicone fiber for a sturdy finish.
- Sew petals symmetrically to avoid a lopsided look.
- Embroider the mouth after closing the flower face for easier handling.
Uses
- Desktop ornament
- Homemade gift
- Children's room decor
- Craft fair item
- Beginner amigurumi practice
Materials Needed
- Yarn:
- Duna green (color 5638) for stem and leaf
- Duna red (color 3542) for petals
- Barroco Maxcolor 4 brown (color 7311) for flower base
- Barroco Maxcolor 4 yellow (color 1114) or leftovers for flower face
- Anne black yarn for mouth embroidery
- Mini vase: About 4 cm diameter
- Barbecue stick: For stem
- Tapestry needle
- 3mm crochet hook
- Safety eyes: 5mm, black, with locks
- Pins: For marking petals
- Craft glue (Pegamil Universal or hot glue)
- Silicone fiber: For stuffing
- Scissors
Step-by-Step Pattern
1. Flower Face (Basic Amigurumi Sphere)
- Magic Ring: With yellow yarn, make a magic ring.
- Round 1: 6 SC into ring, pull tight.
- Round 2: 2 SC in each stitch (12 SC).
- Round 3: (SC, inc) around (18 SC).
- Round 4: (2 SC, inc) around (24 SC).
- Round 5: (3 SC, inc) around (30 SC).
- Rounds 6–12: SC in each stitch for 7 rows.
- Round 13: (3 SC, invisible decrease) around.

- Round 14: (2 SC, invisible decrease) around.
- Install 5mm safety eyes: Count from magic ring, place between rows 10 and 11, 2–4 stitches apart.
- Round 15: (SC, invisible decrease) around.

- Stuff firmly with fiber.
- Round 16: Invisible decrease in each stitch until closed.
- Finish: Cut yarn, use tapestry needle to close and hide the end.
2. Flower Petals (Make 7 Total)
- Magic Ring: With red yarn, make a magic ring.
- Round 1: 6 SC into ring.
- Round 2: 2 SC in each stitch (12 SC).
- Round 3: (SC, inc) around (18 SC).
- Rounds 4–11: SC in each stitch for 8 rows.
- Round 12: (SC, invisible decrease) around.
- Round 13: SC in each stitch.
- Finish: Use tapestry needle to close and leave a tail for sewing.
3. Assemble Petals to Flower Face
- Use pins to mark petal placement around the flower face, leaving the closed part of the sphere in the back.
- Sew each petal close to the flower’s face using tapestry needle and leftover red yarn, alternating: stitch on petal, stitch on sphere, for a tight fit.

4. Embroider the Flower’s Mouth
- With Anne black yarn, use tapestry needle to create three knots at end.
- Mark mouth placement diagonally under eyes using pins.
- Embroider smile between the pins, exiting and re-entering at each marking.
- Hide ends inside sphere; cut excess yarn.
5. Stem and Leaf
Stem:
- Break barbecue stick to 17 cm length.
- Mark 4 cm from one end with a pen.
- Apply glue (Pegamil Universal or hot glue) to stick.
- Wrap stick tightly with green Duna yarn, adding glue as you go, covering from marking to marking.
- Cut yarn at end, secure tip with glue.
- Insert stem into center of flower face, pushing until green part touches flower.
Leaf:
- Chain 10 with green yarn.
- Row 1: Skip 1, SC in next, HDC in following, DC in each of next 4, DC in next, HDC in next, SC in last.
- Finish with a slip stitch. Leave a long tail.
- Sew leaf to flower base at the magic ring with tapestry needle. Secure and hide yarn inside sphere.
6. Flower Base (Pot Insert)
- Magic Ring: With brown yarn, make a magic ring.
- Round 1: 6 SC into ring.
- Round 2: 2 SC in each stitch (12 SC).
- Round 3: (SC, inc) around (18 SC).
- Round 4: (2 SC, inc) around (24 SC).
- Rounds 5–8: SC in each stitch.
- Stuff firmly with fiber, leaving hole to insert stem.
- Insert flower/stem into base and secure.
- Place entire assembly into small pot.
7. Pot Cover
- Magic Ring: With brown yarn, make a magic ring.
- Round 1: 6 SC into ring.
- Round 2: 2 SC in each stitch (12 SC).
- Round 3: (SC, inc) around (18 SC).
- Round 4: (SC, inc) around (24 SC).
- Round 5: (SC, inc) around (30 SC).
- Continue increasing until diameter of pot is reached.
- Next round: SC in back loops only (to form pot wall).
- Rows: SC in both loops to desired height (around 14 rows).
- Finish: Slip stitch two rounds, cut yarn, hide ends with tapestry needle.

Conclusion
Your adorable amigurumi flower in a pot is complete! This project combines classic amigurumi skills with creative sewing and embellishment, resulting in a decorative, free-standing flower. Use it to brighten any space, as a personalized gift, or to practice making your own crochet bouquets!
Crochet Tip
Mark the start of each round while working in spirals. This prevents losing count and gives a neat finish. Also, stuff your flower firmly for long-lasting shape—don’t be afraid to use more filling than you think.


Leave a Reply