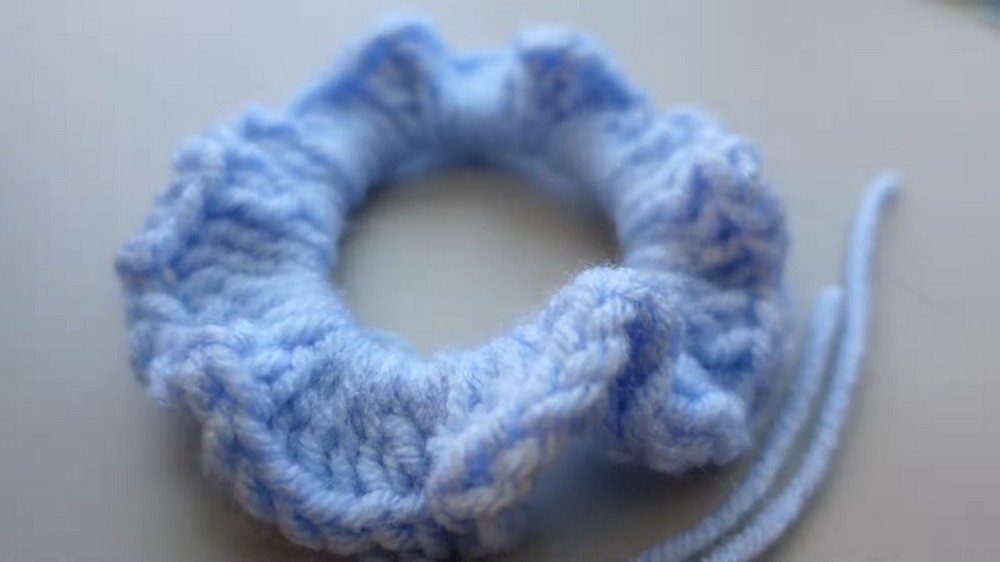
Intensify your handmade style with the perfect crochet scrunchie pattern, easy to follow, fun to make, and a chic accessory you'll love.
Every wardrobe deserves a touch of handmade charm, and crochet scrunchies fit the bill perfectly. These cozy yet stylish accessories are a delightful way to add personality to your hair routine. Made with soft, versatile yarns, they’re gentle on hair and help prevent unwanted breakage caused by regular elastic bands. Beyond their practicality, these scrunchies stand as wearable art, showcasing intricate textures and vibrant designs that bring character to any outfit. Their lightweight and stretchable nature make them ideal for casual days, gym sessions, or even dressing up for special occasions.
How to Crochet Scrunchie pattern for Every Occasion

Offering an eco-friendly alternative to store-bought hair accessories, crocheted scrunchies can be made using leftover yarn—reducing waste and promoting sustainable fashion. For those looking to make heartfelt gifts, these scrunchies are the perfect choice. Their handmade touch adds a layer of meaning and effort that store-bought items simply can’t match.
Versatile and timeless, they suit all ages and can be customized in size and color to suit personal preferences. Practical, stylish, and environmentally conscious, these scrunchies are proof that small details make a big impact. Add them to your collection or gift them to loved ones—they’ll quickly become everyone’s favorite go-to accessory.
Materials Needed
- Yarn: Any yarn can be used, but beginners should start with basic yarn that is smooth and easy to handle. (Avoid "funky" or fuzzy yarn at first to avoid frustration.)
- Hook: A crochet hook matching the yarn weight (e.g., 5.5 mm or 6 mm for medium-weight yarn).
- Scissors: For trimming yarn ends.
- Tapestry Needle (Optional): For weaving in ends.
- Hair Tie/Elastic: Use larger, thick hair ties as these are comfortable for wearing on the wrist and provide plenty of room for crocheting around.

Key Features of This Project
- Beginner Level Design: The tutorial is specifically tailored for those with no prior crochet experience. Even if you've never picked up a crochet hook before, you’ll find it simple and enjoyable.
- Quick to Finish: Each scrunchie can be completed in just minutes once you get the hang of the steps.
- Versatility: The scrunchies can be worn in hair or on the wrist as trendy accessories. They’re also lightweight and portable to make during spare moments.
Step-by-Step Instructions
Step 1: Preparing the Supplies
- Gather all materials listed, ensuring the crochet hook size matches the yarn.
- For best results, beginners should choose medium-weight yarn labeled as “4” for ease in visibility and handling.
Step 2: Making a Slip Knot
- Create a tail of yarn a few inches long.
- Form an "X" shape with the yarn around your finger and pull the second loop under the first with the hook to form a slip knot.
- Tighten the knot on the hook until it’s snug but able to move easily.
3: Attaching Yarn to the Hair Tie
- Hold your hook and yarn with a comfortable grip.
- Place the hair tie in front, bring the hook under it, and pull a loop of working yarn through.
- Pull this loop through the initial loop on the hook to secure the yarn to the hair tie (slip stitch).
4: Making Chains
- Create two chains to match the height of the double crochets you'll be working with.
- Yarn over and pull through the loop twice to form these chains.

5: Double Crochets Around the Hair Tie
- Yarn over your hook, go under the hair tie, and pull through a loop, creating three loops on your hook.
- Yarn over again and pull through two loops, then yarn over once more and pull through the remaining two loops.

- Repeat this process of making double crochets around the hair tie, moving the stitches closer together as you go to create a ruffled effect.
- Continue crocheting until the hair tie is completely covered, pulling stitches tighter to achieve a full texture.

6: Joining the Ends
- At the end of the row, join the final stitch with the starting chains using a slip stitch.
- This will close the round and create a seamless connection.
7: Finishing the Scrunchie
- Trim the yarn (leaving a tail of about 6 inches) and pull the end through the last loop to secure it.
- Weave the yarn ends into the existing stitches using your hook or tapestry needle for a neat finish.
Tutor’s Suggestions
- Take Your Time as a Beginner: Focus on mastering how to hold your hook, how to maintain consistent tension, and how to form even stitches.
- Use Smooth, Basic Yarn for Practice: Avoid textured or fuzzy yarn until you’re comfortable with the stitches.
- Relax Your Grip: Don’t pull the yarn too tightly, as it will make crocheting harder, and avoid leaving it too loose to prevent slipping off the hook.
Uses and Benefits
- These scrunchies are versatile and can be used as stylish hair accessories, wristbands, or even handmade gifts.
- Perfect for using leftover yarn from larger projects.
- Portable and quick, making it ideal for crafting on the go.
Tips for Success
- Ensure your tension is consistent throughout to prevent tight or loose patches.
- If you want an extra-ruffled effect, push stitches closer together and fully pack the yarn around the hair tie.
- For a unique look, experiment with different yarn colors or textures once you're comfortable with the basics.
Conclusion
Crocheting scrunchies is more than just a fun project it’s a relaxing way to learn valuable crochet skills and produce functional items. This beginner-friendly tutorial empowers you to make stylish, personalized accessories with minimal effort and materials. Whether you're giving them as gifts or adding to your own collection, these scrunchies are a delightful product of your newfound skill. Keep practicing, and soon you'll have a collection of beautifully handmade scrunchies to show off!


Leave a Reply