Free Crochet Wind Spinner pumpkin Pattern for Effortless Indoor or Outdoor Charm

The benefits stretch beyond aesthetics. Crocheting is a relaxing hobby that helps you unplug and enjoy the meditative rhythm of the stitches. Plus, the finished spinner is a cost-effective alternative to store-bought decor, with the bonus of customizing it with your favorite colors and themes. Whether you want it seasonally themed, like a pumpkin for fall, or bright and bold for year-round charm, the possibilities are endless.
Lightweight yet durable, it’s an excellent way to use up leftover yarn from other projects while adding a cheerful vibe to your living space. With just a little effort, a simple crochet pattern transforms into a piece that spins joy into your life while highlighting your creativity.
Materials Needed
Here’s a list of what you’ll need to create your pumpkin wind spinner:
- 3 mm Crochet Hook
- Yarn: Orange for the pumpkin body and green or brown for the stalk.
- Fiberfill: For stuffing your pumpkin (use fiberfill for quicker drying if exposed to rain).
- Scissors
- Tapestry Needle
- Optional: A clear waterproofing spray if you plan to hang this spinner outdoors.
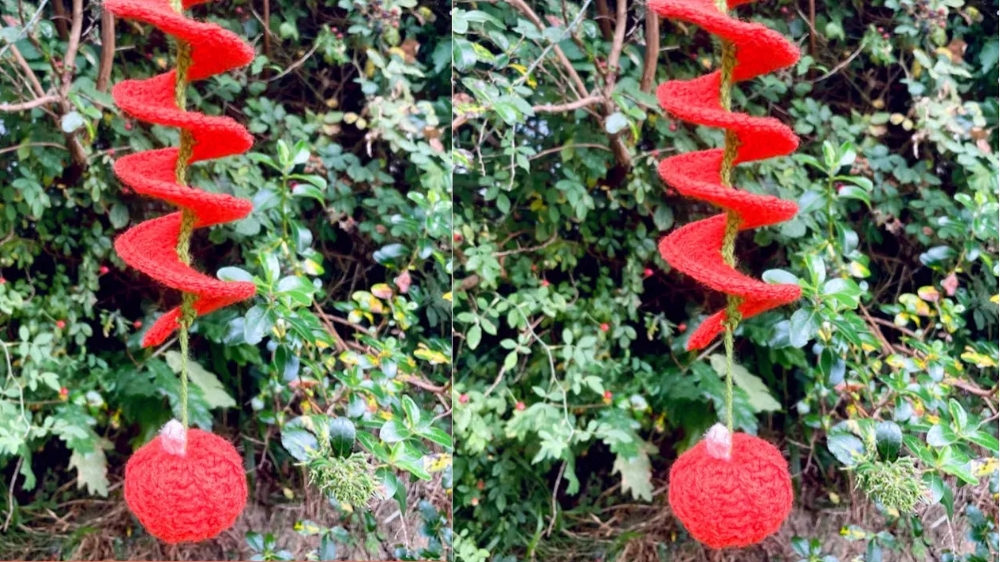
Looking for a fun and festive crochet to bring autumn vibes into your home? This Pumpkin Wind Spinner is the perfect project! In this tutorial, you’ll learn how to create a pumpkin-themed wind spinner with a ribbed miniature pumpkin as a finishing touch. It’s a creative way to spruce up your fall décor, whether it’s for Halloween, Thanksgiving, or just to add a cozy seasonal flair to your space.
Special Features
- The design creates beautiful spirals that spin effortlessly in the wind.
- Includes a ribbed miniature pumpkin for added charm.
- Double-crochet increases form the unique curling effect in the spinner.
- The pumpkin uses a third-loop half-double crochet technique for a realistic ribbing texture.
Step-by-Step Instructions
1: Creating the Spinner Spiral
- Starting the Base:
- Make a slip knot.
- Chain 50 for the best results, but the video demonstrates with a chain of 30 for clarity.

- Round 1:
- Single crochet (SC) into the second chain from the hook and each subsequent chain.
- You’ll finish with 29 single crochets if you chained 30 initially.
- Color Change:
- On the last stitch of Round 1, switch to your second color (orange).
- Insert the hook, yarn over with the green, and pull through two loops. Attach the orange yarn and begin chaining with it.
- Round 2:
- Chain 3, and turn your work.
- Double crochet (DC) into the same stitch as the turning chain.
- Work two double crochets into every stitch across.

- This creates the signature curling effect.
- Round 3:
- Chain 3, turn your work, and start with two double crochets into the first stitch.
- Work three double crochets in each stitch across to enhance the spiral effect.
- Final Round:
- Work a slip stitch into the top of each double crochet from the previous row. This smooths and stiffens the spiral.
- Shaping the Spiral:
- Grab the top of the spiral and twist it naturally into shape. Layer the curls into a stack, then let them unwind into the desired spinner look.

- Grab the top of the spiral and twist it naturally into shape. Layer the curls into a stack, then let them unwind into the desired spinner look.
2: Making the Miniature Pumpkin
- Create the Pumpkin Body:
- Chain 12 to start.
- Work half-double crochets (HDC) into the third loop of each stitch for a ribbed effect.
- Chain 2 at the end of each row, turn, and repeat for a total of 14 rows.
- Shaping the Pumpkin:
- Fold your piece, sew one side shut, and flip it inside out.
- Stuff it with fiberfill and secure the base.
- For a pumpkin shape, create divots by threading yarn from the top down through the center several times.
- Making and Attaching the Pumpkin Stalk:
- Chain 12 for a large stalk and work two rows of single crochet.
- Fold the rectangle lengthwise and slip stitch the edges together to complete the stalk.
- Sew the stalk to the top of the pumpkin.
3: Attaching Components
- Attaching the Pumpkin to the Spinner:
- Use the yarn tails of the pumpkin to attach it securely to the base of the spinner.
- Tie a secure knot and weave in the ends.
- Adding the Stalk to the Spinner:
- Place the stalk centrally at the top of the spinner. Sew it in place, ensuring the hanging cord passes through the stalk to keep it upright.

- Place the stalk centrally at the top of the spinner. Sew it in place, ensuring the hanging cord passes through the stalk to keep it upright.
Tutor’s Suggestions
- For Beginners: Start with a smaller chain (e.g., 30) while practicing the techniques before making the full 50-chain spinner.
- Color Options: While the spinner uses orange and green/brown for a pumpkin theme, you can mix up the colors for other seasonal looks.
- Waterproofing: If your spinner will be outdoors, consider using a waterproofing spray to protect your yarn.
Uses of the Wind Spinner
- Outdoor décor for porches or gardens.
- Indoor hanging decoration to bring a fall atmosphere.
- Seasonal gifting idea for friends and family.
Level of Difficulty
- Skill Level: Beginner to Intermediate.
The project involves basic crochet techniques like single crochet, double crochet, and half-double crochet, but attention to detail is required for shaping and assembly.
Tip for Success
- To ensure your spinner turns smoothly in the wind, hang it using a single cord rather than multiple strands. This allows it to spin more freely and continuously.
Conclusion
With its vibrant colors, adorable mini pumpkin, and beautiful spiral design, this Crochet Wind Spinner is a perfect way to welcome autumn. Whether you’re decorating indoors or outdoors, this lovely creation is sure to grab attention and elevate the seasonal charm of your space. Don’t forget to have fun crocheting, and enjoy the satisfaction of seeing your wind spinner twirl beautifully in the breeze.


Leave a Reply