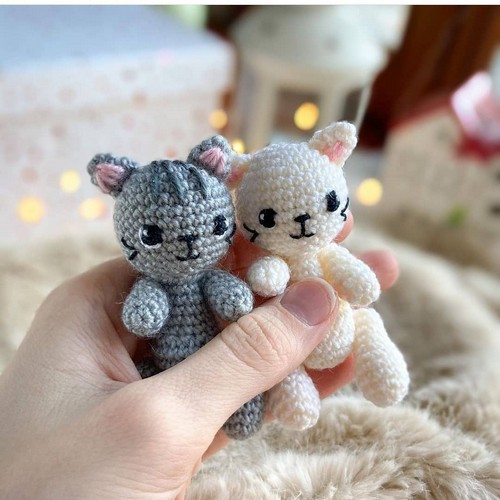
Crochet Fox And Cat Amigurumi
Appearance and Look
Ease of Crafting
- User-Friendly Patterns:
- These simple amigurumi patterns are designed to be clear and easy to follow, ensuring that both beginners and experienced crocheters can enjoy the crafting process.
- Step-by-Step Instructions:
- Each step is detailed and straightforward, making the creation of these animal friends a fun and accessible activity.
Design Details
- Fox Amigurumi:
- Body: Crafted with rich, orange yarn to capture the classic fox look.
- Tail: Features a bushy, white-tipped tail that adds to its playful charm.
- Ears: Pointed ears give it a distinctive and realistic appearance.
- Face: Detailed with safety eyes and a small, black nose to enhance its expressive look.
- Cat Amigurumi:
- Body: Made with soft, grey or any preferred yarn color to create a cozy and inviting appearance.
- Whiskers: Includes embroidered whiskers that add to its cute and friendly semblance.
- Ears: Rounded ears give it a cuddly and approachable look.
- Face: Features safety eyes and a small nose, capturing the endearing essence of a beloved pet.
Emotional Connection
- Gift Potential:
- These amigurumi animals make perfect handmade gifts, offering a personal touch that will delight friends and family.
- Personal Keepsake:
- Ideal for keeping a charming piece of handcrafted art, these amigurumi pieces can brighten up any space in your home.
Call to Action
- Engage your creativity and crochet skills to make adorable fox and cat amigurumi that are sure to bring joy and warmth, whether kept for yourself or given to someone special.
Summary
Explore our straightforward patterns to craft delightful fox and cat amigurumi with realistic features and charming details. Whether you’re making heartfelt gifts or personal keepsakes, these handmade creations are sure to bring smiles and warmth to any occasion.
Making Your Crochet Fox And Cat Amigurumi
Materials- Yarn. I used Vita Brilliant (380 m in 100 g.)
- Crochet hook 1,5 or 1,75 mm.
- Toy filler
- Black and white thread for embroidery. I used cotton thread
- Needle
- Plastic eyes if you don't embroider
- The height of the toys is 8 cm.
- MR -magic (amigurumi) ring
- sc - single crochet
- ch - chain
- slst - slip stitch
- hdc - half double crochet
- dc - double crochet
- inc - increase
- dec - decrease
Step-by-step Pattern
Fox :
Head- Start with orange
- 1 - 6 sc in MR
- 2-6 inc (12)
- 3-(1 sc, inc)*6 (18)
- 4-(2 sc, inc)*6 (24)
- 5- (3 sc, inc)*6 (30)
- 6-9-30 sc (4 rows)
- Change to beige
- 10-11-30 sc (2 rows)
- 12- (3 sc, dec)*6 (24)
- 13-(2 sc, dec)*6 (18)
- 14-(1 sc, dec)*6 (12)
- Fasten thread, cut, and hide inside. Stuff.
- 1 - 6 sc in MR
- 2-6 inc (12)
- 3-(1 sc, inc)*6 (18)
- 4-(2 sc, inc)*6 (24)
- 5-7-24 sc (3 rows)
- 8 - 6 dec, (1 sc, dec)*4 (14)
- 9-11-14 sc (3 rows)
- 12-(5 sc, dec)*2 (12)
- 13-12 sc
- Leave the thread for sewing. Stuff.
- 1-6 sc in MR
- 2-6 sc
- 3-(1 sc, inc)*3 (9)
- 4-9 sc
- Sew the edges with a needle.
- Leave the thread for sewing.
- 1 - 6 sc in MR
- 2-6 inc (12)
- 3-5-12 sc (3 rows)
- 6-(2 sc, dec)*3 (9)
- 7-10-9 sc (4 rows) Stuff.
- Pull the opening, fasten the thread, and hide inside.
- Start with beige
- 1 - 6 sc in MR
- 2-6 sc
- 3-(1 sc, inc)*3 (9)
- 4-9 sc
- Change to orange5-(2 sc, inc)*3 (12)
- 6-12 sc
- 7-(2 sc, dec)*3 (9)
- 8-9 sc
- 9-(1 sc, dec)*3 (6) Stuff.
- Sew the edges with a needle.
- Leave the thread for sewing.
- 1 - 6 sc in MR
- 2- (1 sc, inc)*3 (9)
- 3-4-9 sc (2 rows)
- 5-(1 sc, dec)*3 (6)
- 6-7 -6 sc (2 rows)
- Stuff.
- Pull the opening, fasten the thread, and hide inside.
- Sew the ears on 2-4 rows on the sides of the head.
- Embroider nose between 9th and 10th rows, smile between 11th and 12th rows, and a vertical line between them.
- Embroider/ glue/ sew eyes on 9th row; there are 5 sc between the eyes.
- Sew the head to the body.
- Attach arms using thread, attaching (or sewing) 1 row below the seam between head and body.
- Attach legs using thread attaching (or sewing) between the 4th and 5th rows of the body on the sides.
- Sew the tail on the back of the toy in about 5-6 rows.
Cat
Head- 1 - 6 sc in MR
- 2-6 inc (12)
- 3-(1 sc, inc)*6 (18)
- 4-(2 sc, inc)*6 (24)
- 5-(3 sc, inc)*6 (30)
- 6-11-30 sc (6 rows)
- 12-(3 sc, dec)*6 (24)
- 13-(2 sc, dec)*6 (18)
- 14-(1 sc, dec)*6 (12)
- Fasten thread, cut, and hide
- inside. Stuff.
- 1-6 sc in MR
- 2-6 inc (12)
- 3-(1 sc, inc)*6 (18)
- 4-(2 sc, inc)*6 (24)
- 5-7-24 sc (3 rows)
- 8-6 dec, (1 sc, dec)*4 (14)
- 9-11-14 sc (3 rows)
- 12-(5 sc, dec)*2 (12)
- 13-12 sc
- Leave the thread for sewing. Stuff.
- 1-6 sc in MR
- 2-6 sc
- 3-(1 sc, inc)*3 (9)
- Sew the edges with a needle. Leave the thread for sewing.
- 1 - 6 sc in MR
- 2-6 inc (12)
- 3-5-12 sc (3 rows)
- 6-(2 sc, dec)*3 (9)
- 7-10-9 sc (4 rows) Stuff.
- Pull the opening, fasten the thread, and hide inside.
- 1 - 6 sc in MR
- 2- (1 sc, inc)*3 (9)
- 3-4 9 sc (2 rows)
- 5-(1 sc, dec)*3 (6)
- 6-7 -6 sc (2 rows) Stuff.
- Pull the opening, fasten the thread, and hide inside.
- 1 - 6 sc in MR
- 2- (1 sc, inc)*3 (9)
- 3-8-9 sc (6 rows)
- 9-(1 sc, dec)*3 (6)
- Stuff. Sew the edges with a needle. Leave the thread for sewing.
- Sew the ears on 2-4 rows on the sides of the head.
- Embroider nose between 9th and 10th rows, smile between 11th and 12th rows, and a vertical line between them; embroider whiskers with two stitches on 10th and 11th rows on the sides (stitch length is about 1 sc)
- Embroider/ glue/ sew eyes on 9th row; there are 5 sc between the eyes
- Sew the head to the body
- Attach arms using thread, attaching (or sew) 1 row below the seam between the head and body.
- Attach legs using thread attaching (or sewing) between the 4th and 5th rows of the body on the sides.
- Sew the tail on the back of the toy on about 5-6 rows
 Designer: Scandistyle_dolls On Instagram


Leave a Reply