
Birds are such delightful little creatures, aren't they? People all around the world love birds for their sweet songs, bright feathers, and the way they dance in the sky. We're here to help you create a super cute crochet bird keychain with the simplest pattern we are providing. The best part? The crochet keychain pattern boasts two charming designs.
Crochet Bird Amigurumi Keychain
Appearance and Look
Design Variations
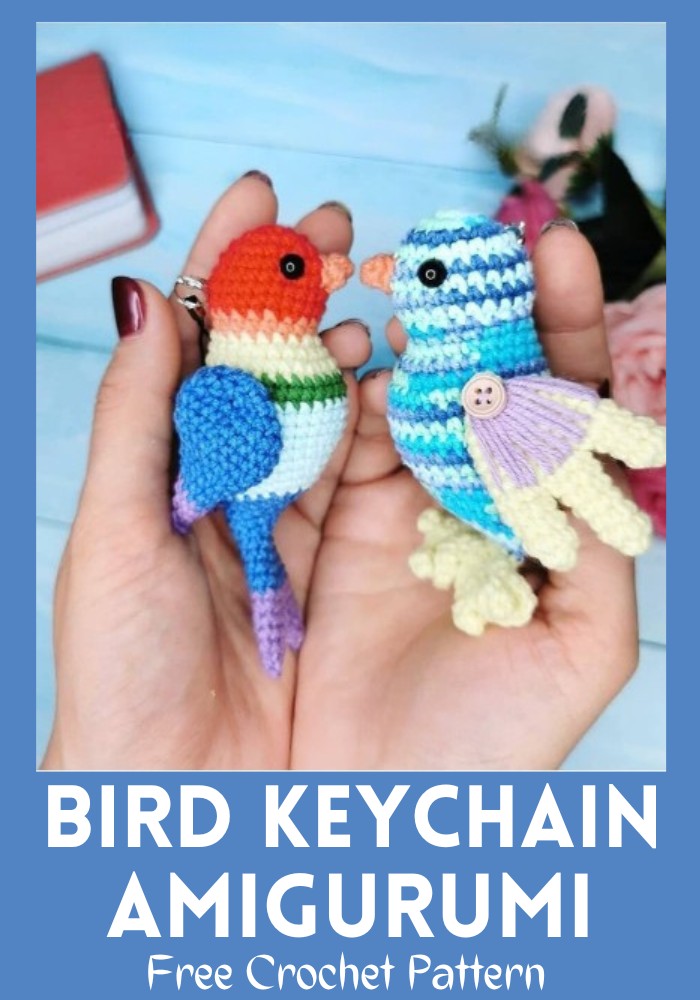
- Version 1: Rainbow Stripe
- Body Shape: Slim and vibrant with a rainbow-striped pattern.
- Wings and Tail: Features streamlined, fish-like designs for a sleek appearance.
- Version 2: Blue Palette
- Color Scheme: A calm blue base complemented by stylish stripes.
- Tail and Wings:
- Tail: A unique yellow with rugged texture for added flair.
- Wings: Fork-shaped, adorned with threaded embellishments and finished with a cute button at the joints for a whimsical touch.
Versatility and Uses
- Applications:
- Keychains: Both versions are ideal for adding a personal touch to keys.
- Playful Toys: Serve as charming toys that inspire imaginative play.
- Home Decor: Make for unique and eye-catching decorations around the home.
- Amigurumi Gifts: Perfect as heartfelt and handcrafted gifts for loved ones, showcasing attention to detail and personal effort.
Additional Features
- Customization: Both designs allow for customization in colors and embellishments to match personal style or fit particular themes.
- Texture and Details: Each version is crafted with careful attention to texture and detail, from the rugged tail to the threaded wing embellishments, enhancing the tactile and visual appeal.
Summary
The Crochet Bird Amigurumi Keychain Free Pattern presents two creative versions: a vibrant rainbow-striped design and a serene blue palette. Both offer unique features, such as textured tails and detailed wings, making them versatile as keychains, toys, home decor, or heartwarming amigurumi gifts.
Making Your Crochet Bird Keychain
Required Materials:- Sport weight/4ply yarn Yarn Art Jeans or other analogue. You can choose any color to your taste.
- Hook size 1.8 mm - 2 mm.
- Polyester toy filling.
- Eyes - black half-beads size 6 mm.
- Glue for eyes.
- Needle with a wide eye, stitch marker, scissors.
- Keychain.
- MR magic ring
- sc - single crochet
- inc - increase (2 sc in one stitch)
- dec - decrease (2 sc together)
- sts - stitches
- ch - chain
- sl st - slip stitch
- (...)*N repeat instruction in brackets N times
Step by step Pattern
Head & Body:- Marker runs along the middle of the back. Crochet extra stitches if necessary.
- 1 Rnd. 6 sc in MR
- 2 Rnd. 6 inc = 12 sts
- 3 Rnd. (sc, Inc.)*6 = 18 sts
- 4 Rnd. (2 sc, inc)*6 = 24 sts
- 5-8 Rnd. (4 rounds). 24 sc
- 9 Rnd. (2 sc, dec)*6 = 18 sts
- 10 Rnd. 17 sc, inc = 19 sts
- 11 Rnd. inc, 6 sc, 4 inc, 8 sc = 24 sts
- 12 Rnd. 24 sc
- 13 Rnd. 8 sc, (sc, inc)*4, 8 sc = 28 sts. Align the marker.
- 14 Rnd. 27 sc, inc = 29 sts
- 15 Rnd. inc, 28 sc = 30 sts
- 16-19 Rnd. (4 rounds). 30 sc
- Align the marker.
- 20 Rnd. 10 sc, (sc, dec)*3, 11 sc = 27 sts
- 21 Rnd. 27 sc
- 22 Rnd. 10 sc, (dec, 2 sc)*2, 7 sc, dec = 24 sts
- 23 Rnd. dec, 22 sc = 23 sts
- Align the marker.
- Stuff the piece.
- 24 Rnd. 5 sc, (sc, dec)*4, 6 sc = 19 sts
- 25 Rnd. 6 sc, 3 dec, 7 sc = 16 sts
- 26 Rnd. 4 sc, 4 dec, 4 sc = 12 sts
- Do not cut the yarn. Next, crochet the tail. See 2 options of the tail on the next pages.
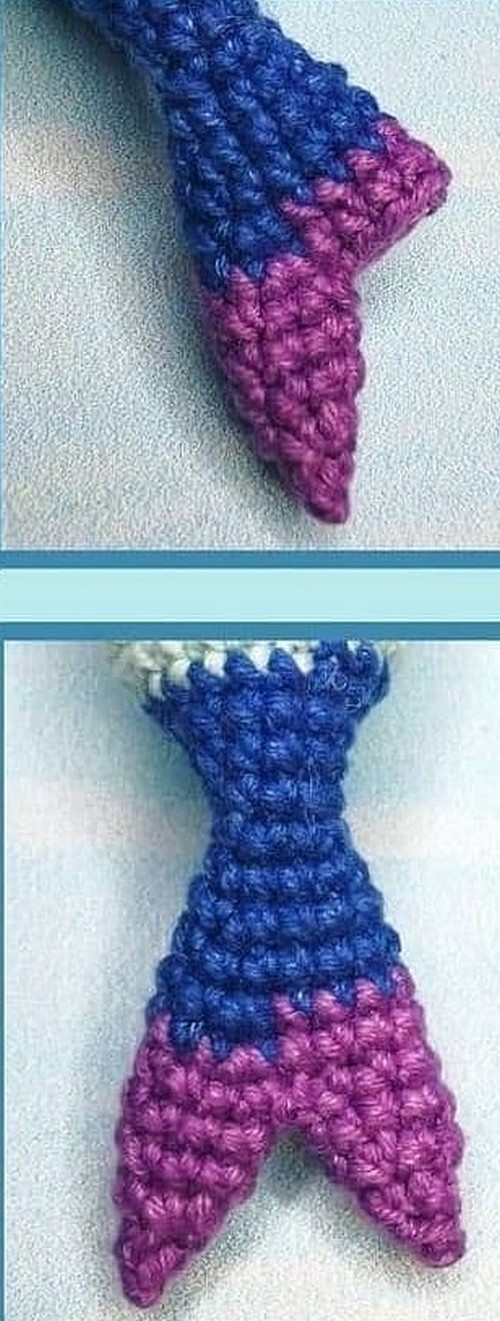 Tail. Option 1.
- The marker runs strictly in the middle of the back and upper part of the tail.
- 27 Rnd. 4 sc, 2 dec, 4 sc = 10 sts
- 28 Rnd. (3 sc, dec)*2 = 8 sts
- 29 Rnd. (3 sc, inc)*2 = 10 sts
- 30 Rnd. (4 sc, inc)*2 = 12 sts
- 31 Rnd. 12 sc
- 32 Rnd. (5 sc, inc)*2 = 14 sts
- 33 Rnd. (6 sc, inc)*2 = 16 sts. Align the marker.
- 34 Rnd. 16 sc
- First, crochet one tip of the tail.
- Skip 8 sts and crochet from the next stitch:
- 35 Rnd. 8 sc. Next, work in a spiral.
- 36 Rnd. 8 sc
- 37 Rnd. (2 sc, dec)*2 = 6 sts
- 38 Rnd. 3 Dec
- Cut the yarn and carefully tighten the hole.
- Weave in the ends inside the tail.
- Attach the yarn to the hole on the tail, crochet the second tip, and repeat rounds 35-38.
- 27 Rnd. Fold the tail in half so that the tail is a continuation of the back.
- Crochet 6 sc through both sides. Turn.
- 28 Row. (ch8, from the second chain: 7 sc, 1 sc on the base)*5,
- ch8, from the second chain: 7 sc, sl st.
- Cut the yarn and weave in the ends.
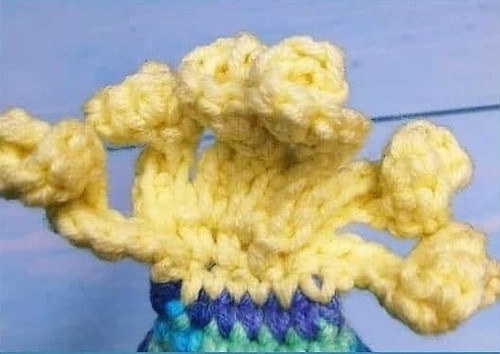 Beak:
Beak:
- 1 Rnd. 5 sc in MR
- 2 Rnd. (SC, inc)*2, sl st
- Cut the yarn, leaving a long tail for sewing.
- Sew the beak between rounds 4 and 6 of the head.
 WINGS. OPTION 1. (MAKE 2)
- Do not stuff with fiberfill.
- 1 Rnd. 6 sc in MR
- 2 Rnd. 6 inc = 12 sts
- 3 Rnd. (SC, inc)*6 = 18 sts
- 4 Rnd. (2 sc, inc)*6 = 24 sts
- 5-6 Rnd. (2 rounds). 24 sc
- 7 Rnd. (2 sc, dec)*6 = 18 sts
- 8 Rnd. 18 sc
- 9 Rnd. (sc, dec)*6 = 12 sts
- 10 Rnd. 12 sc
- 11 Rnd. dec, 10 sc = 11 sts
- 12 Rnd. dec, 9 sc = 10 sts
- 13 Rnd. (3 sc, dec)*2 = 8 sts
- 14 Rnd. (2 sc, dec)*2 = 6 sts
- 15 Rnd. 3 Dec
- Cut the yarn and gently tighten the hole. Weave in the ends.
 WINGS. OPTION 2 (MAKE 2)
- Do not stuff with fiberfill.
- Crochet 1 piece for each wing:
- 1 Rnd. 6 sc in MR
- 2-6 Rnd. (5 rounds). 6 sc
- Fasten off and cut the yarn.
- Crochet 2 pieces for each wing:
- 1 Rnd. 6 sc in MR
- 2-4 Rnd. (3 rounds). 6 sc
- Fasten off and cut the yarn.
- Do not cut the yarn on the second piece.
- 5 Rnd. 6 sc on it.
- Apply the long piece and crochet on it: 3 sc; apply the short piece and crochet on it: 6 sc, 3 sc on the long piece.
- Place the marker.
- 6-7 Rnd. (2 rounds). 18 sc
- 8 Rnd. (7 sc, dec)*2 = 16 sts
- 9 Rnd. (6 sc, dec)*2 = 14 sts
- 10 Rnd. (5 sc, dec)*2 = 12 sts
- 11 Rnd. (sc, dec)*4 = 8 sts
- 12 Rnd. 4 Dec
- Cut the yarn gently and tighten the hole.
- Weave in the ends.
- You can decorate the wings to your taste with embroidery, beads, sequins...
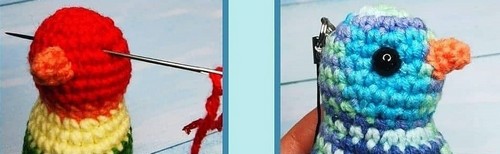 Eyes:
Eyes:
- Make a needle sculpting. Move 2 sc to the right and left side from the upper part of the beak.
- Glue eyes into the places of needle sculpting.
- Sew the wings on the side at the level of ~ Rnd 15-16. You can sew them on, or you can make a thread mount like my birds have.
 Designer: Toys_plyushka On Instagram
Leave a Reply