
Tote your essentials with ease using this Crochet Crossbody Bag Pattern that brings effortless style and a standout touch to every outfit.
Carrying your daily essentials becomes a more graceful experience when you carry a piece that reflects your own unique style and flair. This lovely project transforms simple strands of cotton or sturdy yarn into a hands-free accessory that is both practical and beautiful. A Crochet Crossbody Bag Pattern provides the perfect guide to making a trendy, lightweight purse that rests comfortably across your shoulder for all-day ease.
Urban Crochet Crossbody Bag Pattern With Bold Style for City Days

You can choose earthy tones for a boho look or bright, bold colors to make a striking fashion statement during your summer outings. The final bag offers a secure place for your phone and keys while keeping your hands free for coffee or shopping.
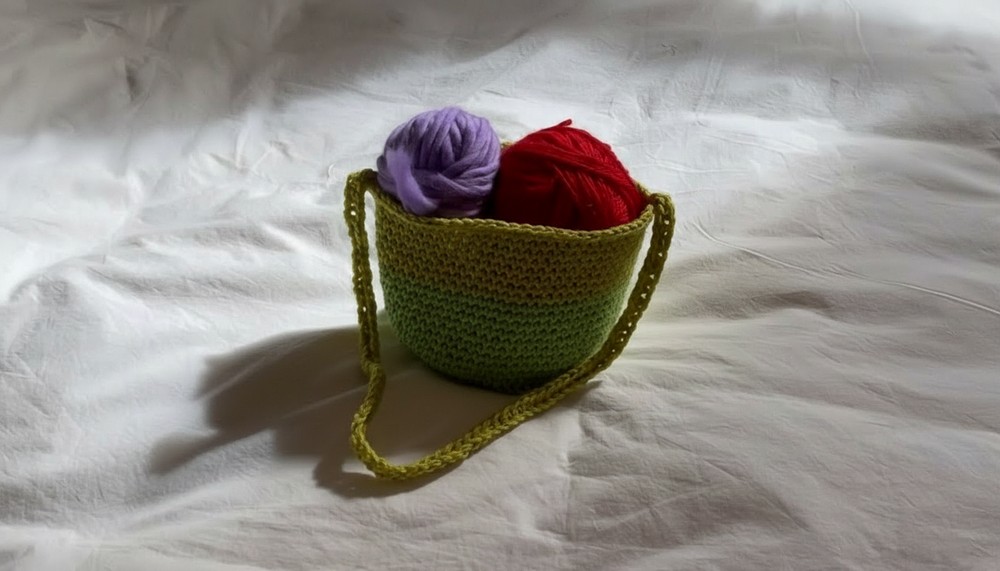
Because this designs are so versatile, they work just as well for a music festival as they do for a quick trip to the grocery store. It is a wonderful choice for making a chic and heartwarming token for a dear friend.
Special Features
- Striking Round ‘Honeypot’ Shape
- Customizable Height & Strap Length
- Option to Add Color Changes for a Fun Look
- Thick, Durable Strap for Comfortable Wear
- Quick Build with Chunky Yarn or Doubled Strands
Level of Difficulty
Adventurous Beginner:
Uses magic ring, continuous rounds, increases, back post work, color change, and basic assembly.
Uses
- Everyday crossbody bag
- Travel pouch
- Gift bag
- Fashion accessory
Materials Needed
- Chunky yarn, t-shirt yarn, or two strands of lighter-weight yarn held together (approx. 100g needed)
- 7mm crochet hook
- Scissors
- Darning needle or a small crochet hook for weaving in ends
- Measuring tape (optional but helpful)
- Stitch markers (optional but helpful)
Step-by-Step Pattern
1. Prepare Materials
Choose your yarn—chunky or hold two strands together. Gather your crochet hook, scissors, darning needle, measuring tape, and stitch markers.
2. Crochet the Base (Rounds)
- Start with a magic ring.
- Round 1: Work 8 single crochet (SC) into the ring. Pull tight to close.
- Use a stitch marker for the start of each round, as you’ll work in a continuous spiral.

Tips:
- Working with more than one strand may feel awkward at first. Keep tension loose for easier stitches.
- Do not join rounds; work in a spiral.
- Round 2: Increase in every stitch (2 SC in each) – 16 stitches.
- Round 3: SC in next, 2 SC in the next (repeat around) – 24 stitches.

- Round 4: SC in next 2, 2 SC in the next (repeat) – 32 stitches.
- Round 5: SC in next 3, 2 SC in next (repeat) – 40 stitches.
- Continue increasing in this manner (the number of single crochets between increases grows by one each round) until your base measures around 160mm (6.29") in diameter (for Rainie, this was about 8 rounds).
Tips:
- Don’t stress if the base looks a bit like an octagon; a final round of regular single crochet helps even edges.
3. Even Out the Base
Work a complete round of single crochet with no increases to smooth the shape.
4. Crochet the Side Walls (Back Posts)
- Transition to sides: Chain one.
- Work a round of back post single crochet to start building the walls vertically.
- For each stitch: insert your hook from the back around the post of the stitch below, pull up a loop, complete an SC.
- Continue working single crochet in the round (spiral method) to build the height until your bag measures 140mm (5.51") high.
- If you wish to change colors, do so at the start of a new round by pulling through the new color for your last loop.

5. Add the Strap
- At the top edge on the final round, find a midpoint.
- Attach yarn and chain 80 (or until the strap reaches your desired length, about 120cm or 40.15").
- Attach the end of your chain to the opposite side of the bag with a single crochet.
- To thicken the strap, work a row of single crochet back along the chain.
- Finish on the starting side; continue with single crochet around the bag’s edge to even out.
6. Finishing
- Slip stitch to close.
- Fasten off with one more chain.
- Weave in all ends with your darning needle or smaller hook.
- Shape your bag and strap as needed.
Tutor’s Suggestions
- T-shirt yarn or chunky upcycled yarn gives great texture and durability.
- Don’t worry about perfect increases—this pattern is forgiving.
- Use a stitch marker for a neater, easier round count.
- Play with color changes for stripes or blocking.
Tip
Keep your tension loose when doubling yarn—this helps you avoid cramped stitches and makes crocheting much more comfortable.
Conclusion
Your unique, chunky honeypot bag is ready to go! Toss in your essentials and sling it over your shoulder for a stylish, handmade finish to any outfit. Enjoy your new creation and the compliments that come with it.




Leave a Reply